Hyundai Tucson: Charging System / Alternator Repair procedures
Hyundai Tucson (LM) 2010-2015 Service Manual / Engine Electrical System / Charging System / Alternator Repair procedures
| Removal |
| 1. |
Turn ignition switch OFF and disconnect the negative (-) battery cable. |
| 2. |
Remove the drive belt.
(Refer to Engine Mechanical System - "Drive Belt") |
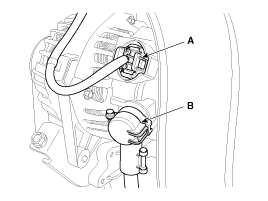
| 3. |
Disconnect the alternator connector (A) and the cable (B) from alternator "B" terminal.
|
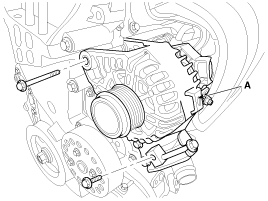
| 4. |
Pull out the through bolt and then remove the alternator (A).
|
| Installation |
| 1. |
Install in the reverse order of removal. |
| 2. |
Adjust the alternator belt tension after installation.
(Refer to Engine Mechanical System - "Drive Belt")
|
| Disassembly |
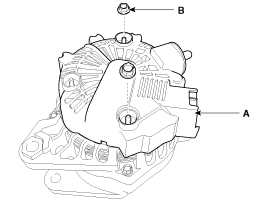
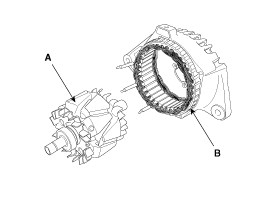
| 1. |
Remove the rear cover (A) after removing nuts (B).
|
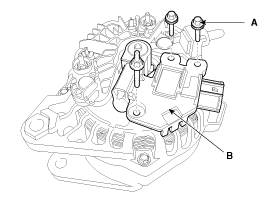
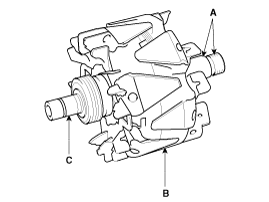
| 2. |
Remove the mounting bolts (A) and the regulator assembly (B).
|
| 3. |
Remove the slip ring guide (A) after pulling it.
|
| 4. |
Remove the OAD(Overrunning Alternator Decoupler) cap.
|

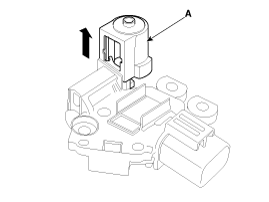
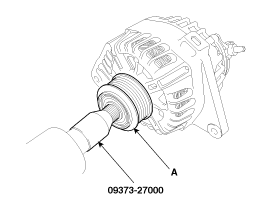
| 5. |
Remove the OAD(Overrunning Alternator Decoupler) pulley (A) using the special tool.
|
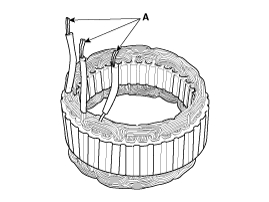
| 6. |
Unsolder the 3 stator leads (A).
|
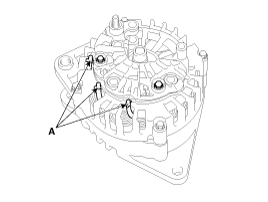
| 7. |
Remove the 4 through bolts (A).
|
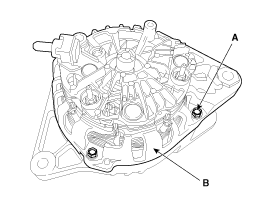
| 8. |
Disconnect the rotor (A) and housing (B).
|
| Reassembly |
| 1. |
Reassemble in the reverse order of disassembly.
|
| Inspection |
| [Rotor] |
| 1. |
Check that there is continuity between the slip rings (C).
|
| 2. |
Check that there is no continuity between the slip rings and the rotor (B) or rotor shaft (A). |
| 3. |
If the rotor fails either continuity check, replace the alternator. |
| [Stator] |
| 1. |
Check that there is continuity between each pair of leads (A).
|
| 2. |
Check that there is no continuity between each lead and the coil core. |
| 3. |
If the coil fails either continuity check, replace the alternator. |
 Alternator Schematic Diagrams
Circuit Diagram
•
COM signal - When
controlling the voltage generated, the ECM sends the target voltage data
to the alternator via a PWM signal.(High voltage: 4V or h ...
 Battery Description and Operation
Description
1.
The CMF(Closed Maintenance Free) battery is, as the name
implies, totally maintenance free and has no removable battery cell
caps.
2.
The CMF(Closed Maintenance Free) batter ...
Other information:
Hyundai Tucson (LM) 2010-2015 Service Manual: Components and Components Location
Component Location
1. Back view camera2. ECM mirror
...
Hyundai Tucson (LM) 2010-2015 Service Manual: Brake Pedal Components and Components Location
Components
1. Cowl bracket2. Brake pedal member assembly3. Stop lamp switch4. Return spring5. Brake pedal stopper6. Clevis pin7. Snap pin8. Brake pedal
...
© 2010-2024 www.htmanual.net
