Hyundai Tucson: Driveshaft Assembly / Dynamic Damper Repair procedures
Hyundai Tucson (LM) 2010-2015 Service Manual / Driveshaft and axle / Driveshaft Assembly / Dynamic Damper Repair procedures
| Removal |
| 1. |
Remove the front driveshaft.
(Refer to Driveshaft Assembly - “Front Driveshaft”) |
| 2. |
Remove the TJ joint assembly.
(Refer to Driveshaft Assembly - “TJ Joint”) |
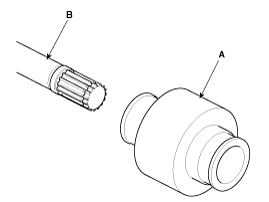
| 3. |
Remove the remove the both side of band (B) of the dynamic damper (A).
|

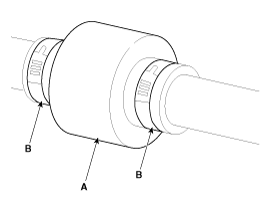
| 4. |
Fix the driveshaft (A) with a vice (B) as illustrated.
|

| 5. |
Apply soap powder on the shaft to prevent being damaged
between the shaft spline and the dynamic damper when the dynamic damper
is removed. |
| 6. |
Seperate the dynamic damper (A) from the shaft (B) carefully.
|
| Installation |
| 1. |
Apply soap powder on the shaft to prevent being damaged between the shaft spline and the dynamic damper. |
| 2. |
Install the dynamic damper. |
| 3. |
Install the dynamic damper band (A). |
| 4. |
Using the SST(09495-3K000), secure the TJ boot bands (B).
|
| 5. |
Install the TJ joint assembly.
(Refer to Driveshaft Assembly - “TJ joint”) |
| 6. |
Install the front driveshaft.
(Refer to Driveshaft Assembly - “Front Driveshaft”) |
| 7. |
Check the front alignment.
(Refer to Suspension System - "Front Alignment") |
 Dynamic Damper Components and Components Location
Components
1. BJ assembly2. BJ circlip3. BJ boot band4. BJ boot5. Dynamic damper band6. Dynamic damper7. Shaft8. TJ boot band9. TJ boot10. Spider assembly11. Retainer ring12. TJ housing13. Housin ...
 BJ Boot Components and Components Location
Components
1. BJ assembly2. BJ circlip3. BJ boot band4. BJ boot5. Dynamic damper band6. Dynamic damper7. Shaft8. TJ boot band9. TJ boot10. Spider assembly11. Retainer ring12. TJ housing13. Housin ...
Other information:
Hyundai Tucson (LM) 2010-2015 Service Manual: Rear Door Repair procedures
Replacement
Door Trim Replacement
•
When prying with a flat-tipped screwdriver, wrap it with
protective tape, and apply protective tape around the related parts, to
prevent damage.
•
Put on gloves to protect your hands.
1.
Using a screwdriver or remo ...
Hyundai Tucson (LM) 2010-2015 Service Manual: Rear Stabilizer Bar Repair procedures
Replacement
1.
Remove the rear wheel & tire.
Tightening torque :
88.3 ~ 107.9N.m (9.0 ~ 11.0kgf.m, 65.1 ~ 79.6lb-ft)
Be careful not to damage to the hub bolts when removing the rear wheel & tire.
2.
Loosen the nut and then remove the rear stabilizer li ...
© 2010-2024 www.htmanual.net
