Hyundai Tucson: Exterior / Rear Door Repair procedures
Door Trim Replacement
| • |
When prying with a flat-tipped screwdriver, wrap it with
protective tape, and apply protective tape around the related parts, to
prevent damage. |
| • |
Put on gloves to protect your hands. |
|
| 1. |
Using a screwdriver or remover, remove the delta inner cover (A). 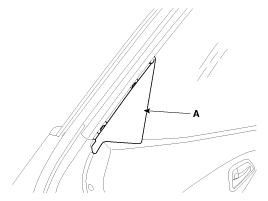
|
| 2. |
After loosening the mounting screw, then remove the door inside handle housing (B). |
| 3. |
Loosen the mounting screws, then remove the door trim (A). 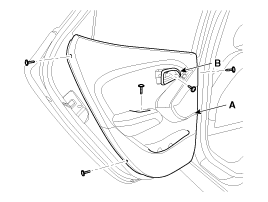
|
| 4. |
Push the lock pin (A), disconnect the power window connector (B). 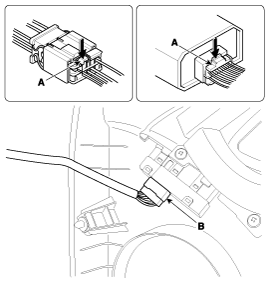
|
| 5. |
Install in the reverse order of removal.
| • |
Make sure connectors are connected properly and each rod is connected securely. |
| • |
Make sure the door locks/unlocks and opens/closes properly. |
| • |
Replace ant damaged clips. |
|
|
Inside Handle Replacement
| 2. |
Remove the door screen (A). 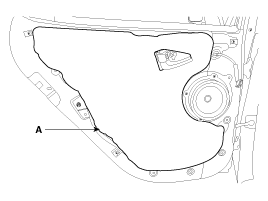
|
| 3. |
After loosening the mounting screws, then remove the inside handle (A). 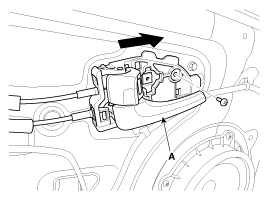
|
| 4. |
Disconnect the inside handle cable (B). 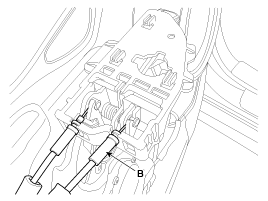
|
| 5. |
Install in the reverse order of removal.
| • |
Make sure the door locks/unlocks and opens/closes properly. |
|
|
Glass Replacement
| 1. |
Remove the following parts.
| C. |
Door belt weatherstrip |
| D. |
Door delta molding cover |
|
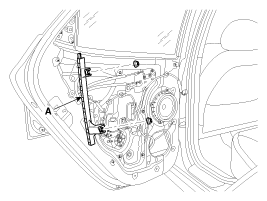
| 2. |
After loosening the mounting nuts, then remove the rear channel (A).
Tightening torque :
6.9 ~ 10.8 N.m (0.7 ~ 1.1kgf.m 5.1 ~ 8.0 lb-ft )
|
|
| 3. |
Remove the glass mounting plug hole.
| • |
Using the door switch to align the mounting hole with the hole on the door glass. |
| • |
If it is impossible, align the hole by hand after removing the motor. |
| • |
Be careful not to drop to glass and scratch the glass surface. |
|
|
| 4. |
Carefully adjust the glass (B) until you can see the bolts,
then loosen them. Separate the glass from the glass run and carefully
pull the glass out through the window slot.
Tightening torque :
6.9 ~ 10.8 N.m (0.7 ~ 1.1kgf.m 5.1 ~ 8.0 lb-ft )
|
|
| 5. |
Install in the reverse order the removal.
| A. |
Roll the glass up down to see if it move freely without binding |
| B. |
Adjust the position of the glass as needed. |
| C. |
Make sure the door locks/unlocks and opens/closes properly. |
| D. |
Replace ant damaged clips |
|
Speaker Replacement
| 2. |
Disconnect the speaker connector (A). |
| 3. |
After loosening the mounting screws, then remove the speaker (B). 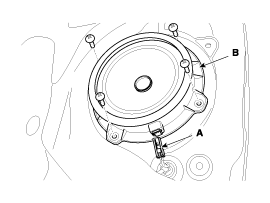
|
| 4. |
Install in the reverse order of removal.
| • |
Use sheet metal screws to secure the speaker. |
| • |
Make sure the door locks/unlocks and opens/closes properly. |
| • |
Make sure the connector is connected properly. |
|
|
Power Window Motor Replacement
| 2. |
Remove the door screen. |
| 3. |
Disconnect the connector (A) |
| 4. |
After loosening the mounting screws, then remove the power window motor (B). 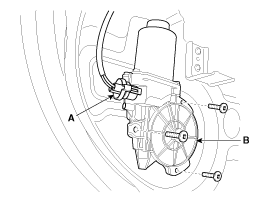
|
| 5. |
Install in the reverse order of removal.
| • |
Grease should be applied to areas where there is rotational parts and springs. |
| • |
Roll the glass up and down to see if it move freely without binding. |
| • |
Make sure the door locks/unlocks and opens/closes properly. |
|
|
Outside Handle Replacement
| 1. |
Disconnect cap, loosen the mounting bolt. |
| 2. |
Remove the handle cover (A).
Tightening torque :
6.9 ~ 10.8 N.m (0.7 ~ 1.1kgf.m, 5.1 ~ 8.0 lb-ft )
|

|
| 3. |
Remove the outside handle (A), by sliding it rearward. 
|
| 4. |
Install in the reverse order of removal.
| • |
Roll the glass up and down to see if it move freely without binding. |
| • |
Make sure the door locks/unlocks and opens/closes properly. |
|
|
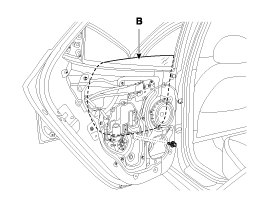
Door Module Assembly Replacement
| 1. |
Remove the following parts.
|
| 2. |
Loosen the mounting screw (A). 
|
| 3. |
After loosening the mounting nuts, then remove the rear channel (A).
Tightening torque :
6.9 ~ 10.8 N.m (0.7 ~ 1.1 kgf.m, 5.1 ~ 8.0 lb-ft )
|
|
| 4. |
Loosen the door module mounting bolts and latch mounting screws. |
| 5. |
Remove the door module (A).
Tightening torque :
6.9 ~ 10.8 N.m (0.7 ~ 1.1 kgf.m, 5.1 ~ 8.0 lb-ft )
|
|
| 6. |
Disconnect the connector (A) and power window motor connecter (B) |
| 7. |
Remove the wiring mounting clip. 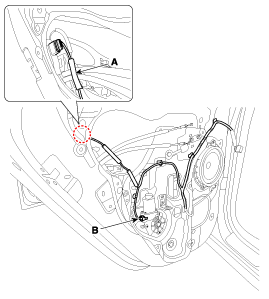
|
| 8. |
Install in the reverse order of removal.
| • |
Grease should be applied to areas where there is rotational parts and springs. |
| • |
Roll the glass up and down to see if it move freely without binding. |
| • |
Make sure the door locks/unlocks and opens/closes properly. |
|
|
Glass Adjustment
| • |
Check the glass run channel for damage or deterioration, and replace them necessary. |
|
| 1. |
Remove the rear door trim. |
| 2. |
Remove the door screen. |
| 3. |
Carefully adjust the glass (A) until you can see the bolt,
then loosen them. Separate the glass from the glass run and carefully
pull the glass out through the window slot. 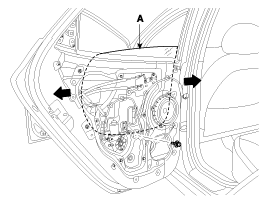
|
| 4. |
Check that the glass moves smoothly. |
| 5. |
Raise the glass fully, and check for gaps.
Check that the glass contacts the glass run channel evenly. |
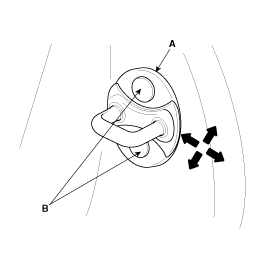
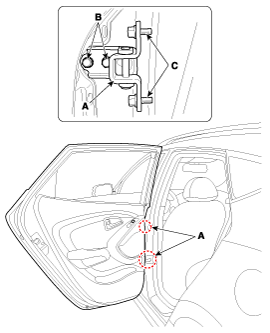
Door Striker Adjustment
Make sure the door latches securely without slamming it. If
necessary adjust the striker (A): The striker nuts are fixed. The
striker can be fine adjusted up or down, and in or out.
| 1. |
Loosen the screws (B) just enough for the striker to move.
Tightening torque (B) :
8.8 ~ 13.7 N.m (0.9 ~ 1.4 kgf.m, 6.5 ~ 10.1 lb-ft )
|
|
| 2. |
Make sure connectors are connected properly and each rod is connected securely. |
| 3. |
Make sure the door locks/unlocks and opens/closes properly. |
Door Position Adjustment
| • |
After installing the door, check for a flush fit with the
body, then check for equal gaps between the front, rear, and bottom,
door edges and the body. Check that the door and body edges are
parallel. Before adjusting, replace the mounting bolts. |
|
| 1. |
Place the vehicle on a firm, level surface when adjusting the doors. |
| 2. |
Check that the door and body edges are parallel. 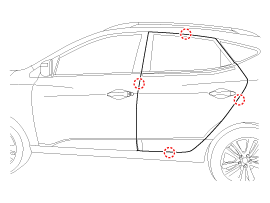
|
| 3. |
Adjust at the hinges (A):
| A. |
Loosen the door mounting bolts slightly, and move the door IN or OUT until it aligns flush with the body. |
| B. |
Loosen the hinge mounting bolts slightly, and move the door BACKWARD or FORWARD, UP or DOWN as necessary to equalize the gaps. |
| C. |
Place a shop towel on the jack to prevent damage to the door when adjusting the door. |
Tightening torque :
(B) : 34.3 ~ 41.2 N.m (3.5 ~ 4.2 kgf.m, 25.3 ~ 30.4 lb-ft )
(C) : 9.8 ~ 19.6 N.m (1.0 ~ 2.0 kgf.m, 7.2 ~ 14.5 lb-ft )
|
|
| 4. |
Grease the pivot portions of the hinges indicated. |
| 5. |
Check for water leaks. |
Components
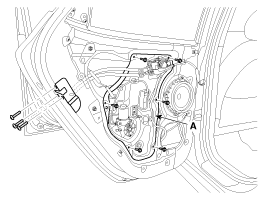
1. Door inside handle housing 2. Door trim3. Door belt inner weatherstrip4. Door screen5. Door module6. Door panel7. Door delta inner cover8. Door belt outside weatherstrip9. Door delt ...
Replacement
Roof Rack Replacement
•
When prying with a flat-tipped screwdriver, wrap it with
protective tape, and apply protective tape around the related parts, to
...
Other information:
Hyundai Tucson (LM) 2010-2015 Service Manual: Repair procedures
Adjustment
TCM Learning
When shift shock is occurred or parts related with the transaxle are replaced, TCM learning should be performed.
In the following case, TCM learning is required.
•
Transaxle assembly replacement
•
TCM replacement
•
TCM upgrading
1.
TCM l ...
Hyundai Tucson (LM) 2010-2015 Owners Manual: Vehicle load limit
Two labels on your driver’s door sill show how much weight your vehicle was designed
to carry: the Tire and Loading Information Label and the Certification Label.
Before loading your vehicle, familiarize yourself with the following terms for
determining your vehicle's weight ratings, from the ...


 Rear Door Components and Components Location
 Body Side Moldings Repair procedures