Hyundai Tucson: Power Door Locks / Power Door Lock Actuators Repair procedures
| Inspection |
| 1. |
Remove the front door trim.
(Refer to the BD group - "Front door") |
| 2. |
Remove the front door module.
(Refer to the BD group - "Front door") |
| 3. |
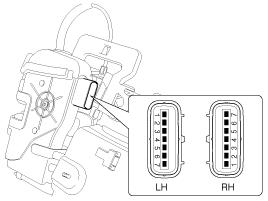
Disconnect the connectors from the actuator.
|
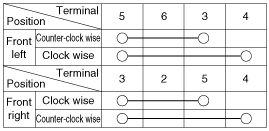
| 4. |
Check actuator operation by connecting power and ground
according to the table. To prevent damage to the actuator, apply battery
voltage only momentarily.
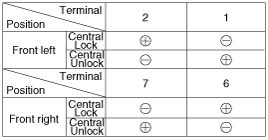
[Central Lock]
[Dead Lock]
|

| 1. |
Remove the rear door trim.
(Refer to the BD group - "Rear door") |
| 2. |
Remove the rear door module.
(Refer to the BD group - "Rear door") |
| 3. |
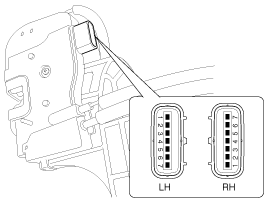
Disconnect the connectors from the actuator.
|
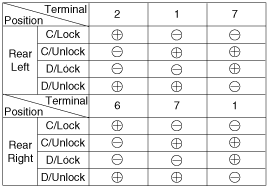
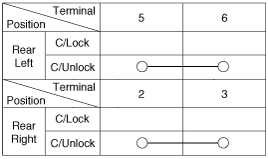
| 4. |
Check actuator operation by connecting power and ground
according to the table. To prevent damage to the actuator, apply battery
voltage only momentarily.
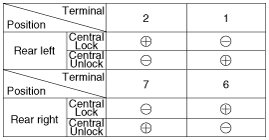
[Central Lock]
[Dead Lock]
|
| 1. |
Remove the liftgate trim.
(Refer to the BD group - "Liftgate") |
| 2. |
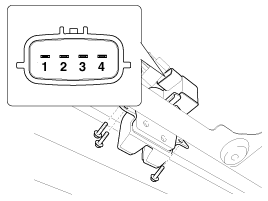
Disconnect the 4P connector from the actuator.
|
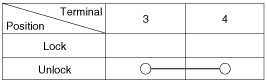
| 3. |
Check actuator operation by connecting power and ground
according to the table. To prevent damage to the actuator, apply battery
voltage only momentarily.
|
| 1. |
Remove the front door trim.
(Refer to the BD group - "Front door") |
| 2. |
Remove the front door module.
(Refer to the BD group - "Front door") |
| 3. |
Disconnect the connectors from the actuator.
|
| 4. |
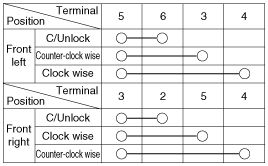
Check for continuity between the terminals in each switch position when inserting the key into the door according to the table.
[Central Lock]
[Dead Lock]
|
| 1. |
Remove the rear door trim.
(Refer to the BD group - "Rear door") |
| 2. |
Remove the rear door module.
(Refer to the BD group - "Rear door") |
| 3. |
Disconnect the connectors from the actuator.
|
| 4. |
Check for continuity between the terminals in each switch position according to the table.
[Central Lock]
|
| 1. |
Remove the liftgate trim.
(Refer to the BD group - "Liftgate") |
| 2. |
Disconnect the 4P connector from the actuator.
|
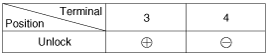
| 3. |
Check for continuity between the terminals in each switch position according to the table.
|
 Components and Components Location
Component Location
1. Driver power window switch2. Assist power window switch3. SJB (Smart Junction Box)4. Door lock switch5. Liftgate lock actuator & switch6. Front door lock actuator & ...
 Power Door Lock Switch Repair procedures
Removal
Driver Power Window Switch
1.
Disconnect the negative battery terminal.
2.
Remove the front door trim.
(Refer to the BD group - "Front door")
3.
Remove the screws from power wind ...
Other information:
Hyundai Tucson (LM) 2010-2015 Owners Manual: Recommended lubricants and capacities
To help achieve proper engine and powertrain performance and durability, use
only lubricants of the proper quality.
The correct lubricants also help promote engine efficiency that results in improved
fuel economy.
*1 Refer to the recommended SAE viscosity numbers on the next page.
*2 Engine ...
Hyundai Tucson (LM) 2010-2015 Service Manual: Troubleshooting
Troubleshooting
SymptomPossible causeRemedyOne lamp does not light(all exterior)Bulb burned outReplace bulbSocket, wiring or ground faultyRepair if necessaryHead lamps do not lightBulb burned outReplace bulbIgnition fuse (LOW:10A, HIGH:20A) blownCheck for short and replace fuseHead lamp fuse (1 ...
