Hyundai Tucson: Engine Control System / Variable Intake Solenoid (VIS) Valve Repair procedures
Hyundai Tucson (LM) 2010-2015 Service Manual / Engine Control / Fuel System / Engine Control System / Variable Intake Solenoid (VIS) Valve Repair procedures
| Inspection |
| 1. |
Turn the ignition switch OFF. |
| 2. |
Disconnect the VIS valve connector. |
| 3. |
Measure resistance between VIS valve terminals 1 and 2.
|
| Removal |
| 1. |
Turn the ignition switch OFF and disconnect the battery negative (-) cable. |
| 2. |
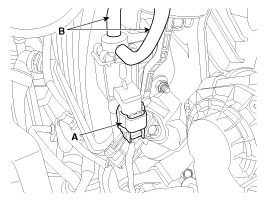
Disconnect the variable intake solenoid valve connector (A). |
| 3. |
Disconnect the vacuum hoses (B) from the valve. |
| 4. |
Remove the installation nut, and then remove the valve from the surge tank.
|
| Installation |
|
|
| 1. |
Install in the reverse order of removal. |
 Variable Intake Solenoid (VIS) Valve Schematic Diagrams
Circuit Diagram
(M/T)
(A/T)
...
 Fuel Pressure Control Valve Description and Operation
Description
Fuel Pressure Control Valve is installed on the high pressure
fuel pump and controls fuel flow flowing into the injectors in
accordance with the ECM signal calculated based on vario ...
Other information:
Hyundai Tucson (LM) 2010-2015 Service Manual: Tire Repair procedures
•
Using tires and wheel other than the recommended sizes could
cause unusual handling characteristics and poor vehicle control,
resulting in a serious accident.
Tire Wear
1.
Measure the tread depth of the tires.
Tread depth [limit] : 1.6 mm (0.063 in)
2. ...
Hyundai Tucson (LM) 2010-2015 Service Manual: Oil Pump Repair procedures
Removal and Installation
1.
Remove the timing chain cover.
(Refer to Timing system in this group)
2.
Remove the oil pump cover (A).
Tightening torque
Screws :
5.9 ~ 8.8 N.m (0.6 ~ 0.9 kgf.m, 4.3 ~ 6.5 lb-ft)
Bolts :
8.8 ~ 13.7 N.m (0.9 ~ 1.4 kgf.m, 6.5 ~ 10.1 lb-ft)
3.
Remove ...
© 2010-2024 www.htmanual.net


