Hyundai Tucson: Rear Axle Assembly / Rear Hub - Carrier Repair procedures
Hyundai Tucson (LM) 2010-2015 Service Manual / Driveshaft and axle / Rear Axle Assembly / Rear Hub - Carrier Repair procedures
| Removal |
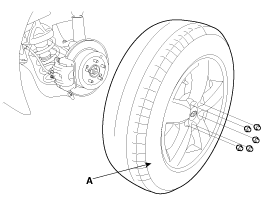
| 1. |
Remove the rear wheel and tire (A) from rear hub.
|

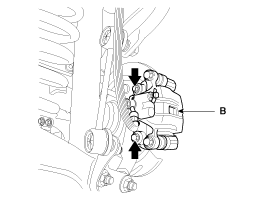
| 2. |
Remove the rear brake caliper mounting bolts, and then fix the brake caliper assembly with wire.
[4WD]
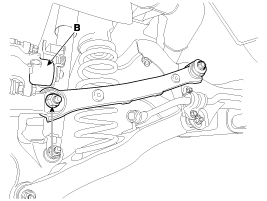
[2WD]
Loosen the upper arm mounting bolts(A) and then remove the caliper(B) by loosen the brake caliper mounting bolts.
|
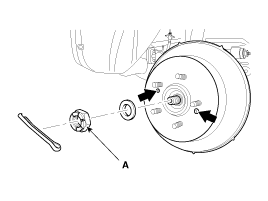
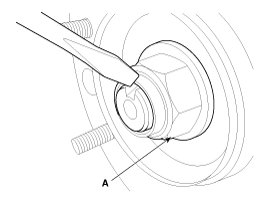
| 3. |
Remove the coking nut (A) and loosen the screw to remove the disc.
|
| 4. |
Loosen the nuts & bolts and then remove the trailing arm (A) with the rear axle.
[2WD]
[4WD]
|


| 5. |
Remove the parking brake cable.
(Refer to Brake System - "Parking Brake Cable") |
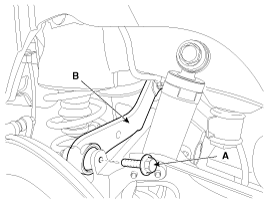
| 6. |
Remove the rear assist arm (B) after loosen the bolt (A).
[2WD]
[4WD]
|
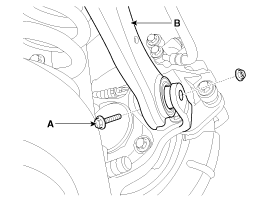
| 7. |
Remove the rear upper arm (A) after loosen the bolt (B). [4WD]
|
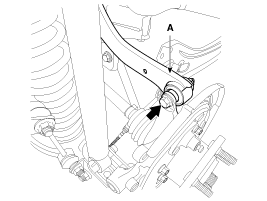
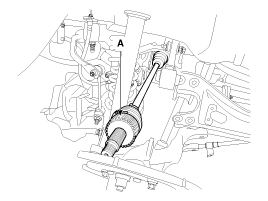
| 8. |
Push the rear axle carrier outward and separate the driveshaft (A) from the axle hub.
|
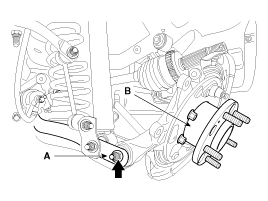
| 9. |
Loosen the lower arm mounting bolt(A) and then remove the rear axle assembly(B).
|
| 10. |
Install in the reverse order of removal. |
| Disassembly |
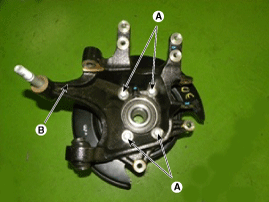
| 1. |
Remove the hub assembly mounting bolts (A-4ea) from the rear axle carrier (B).
|
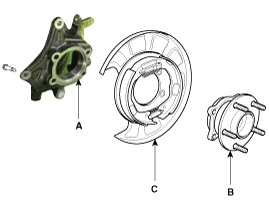
| 2. |
Remove the hub assembly (C) and the parking brake assembly (B) from the rear axle carrier (A).
|
| 3. |
Assembly is the reverse order of disassembly. |
| Inspection |
| 1. |
Check the hub for cracks and the splines for wear. |
| 2. |
Check the rear axle carrier for cracks. |
 Rear Hub - Carrier Components and Components Location
Components
1. Rear carrier assembly2. Parking brake assembly3. Rear hub assembly4. Rear brake disc
...

Other information:
Hyundai Tucson (LM) 2010-2015 Service Manual: Console Repair procedures
Replacement
[M/T]
•
Put on gloves to protect your hands.
•
When prying with a flat-tip screwdriver, wrap it with
protective tape, and apply protective tape around the related parts, to
prevent damage.
•
Use a plastic pane ...
Hyundai Tucson (LM) 2010-2015 Owners Manual: Rear seat headrest
The rear seats are equipped with headrests in all the seating positions for the
passenger’s safety and comfort.
Adjusting the height up and down
To raise the headrest:
1. Pull it up to the desired position (1).
To lower the headrest:
1. Push and hold the release button (2) on the he ...
© 2010-2024 www.htmanual.net
