Hyundai Tucson: Windshield Wiper/Washer / Front Wiper Motor Repair procedures
| Removal |
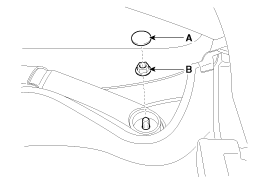
| 1. |
Remove the windshield wiper arm and blade after removing a nut (B) and wiper cap (A).
|
| 2. |
Remove the windshield wiper arm and blade (A) after removing a nut.
|
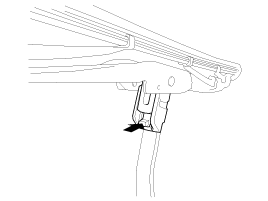
| 3. |
If necessary, release the wiper blade fixing clip by pulling up and remove the wiper blade from the inside radius of wiper arm.
|
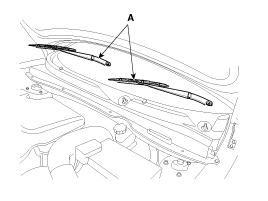
| 4. |
Remove the weather strip and the cowl top cover (A) after removing retainers.
|
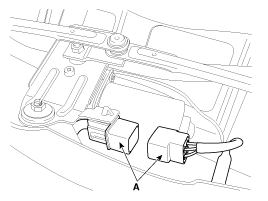
| 5. |
Disconnect the wiper motor connector (A) from the wiper motor & linkage assembly.
|
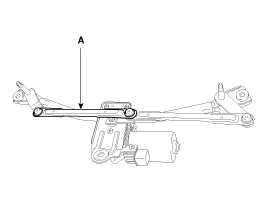
| 6. |
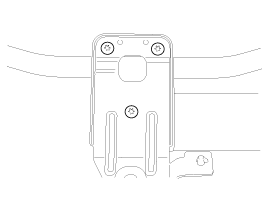
Remove the windshield wiper motor and linkage assembly (A) after removing 3 bolts.
|

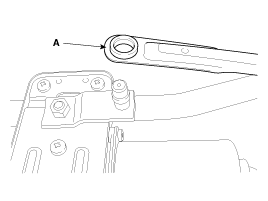
| 7. |
Hold the wiper motor crank arm and remove the upper linkage (A) from the wiper motor crank arm.
|

| 8. |
Remove the lower linkage (A) from the wiper motor crank arm.
|
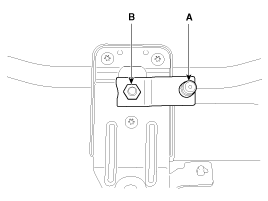
| 9. |
Remove the crank arm (A) after loosening a nut (B).
|
| 10. |
Remove the wiper motor after loosening the 3 screws.
|
| Installation |
Do not allow the wiper arm to fall against the windshield, since it may chip or crack the windshield. |
| 1. |
Install the wiper motor. |
| 2. |
Install the crank arm.
|
| 3. |
Install the lower and upper linkage to the wiper motor crank arm.
|
| 4. |
Install the wiper motor and linkage assembly and then connect the wiper motor connector.
|
| 5. |
Install the cowl top cover. |
| 6. |
Install the windshield wiper arm and blade.
|

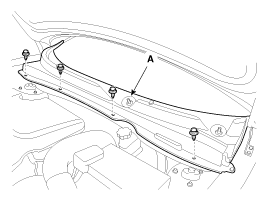
| 7. |
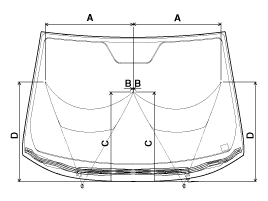
Install the wiper arm and blade to the specified position (A).
|

| 8. |
Set the cowl top cover on the specified spray position.
|
| Inspection |
| 1. |
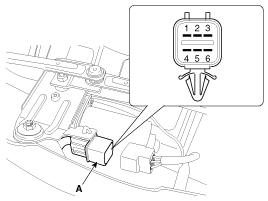
Remove the connector (A) from the wiper motor.
|
| 2. |
Attach the positive (+) lead from the battery to terminal 3 and the negative (-) lead to terminal 4. |
| 3. |
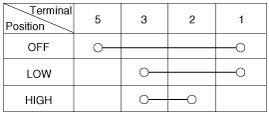
Check that the motor operates at low or high speed as below table.
|
 Front Wiper Motor Components and Components Location
Component Location
1. Cap2. Nut3. Wiper arm & blade4. Retainer5. Cowl top cover6. Bolt7. Wiper motor & linkage assembly8. Wiper motor connector
...
 Front Washer Motor Repair procedures
Inspection
Front Washer Motor
1.
With the washer motor connected to the reservoir tank, fill the reservoir tank with water.
Before filling the reservoir tank with water, ch ...
Other information:
Hyundai Tucson (LM) 2010-2015 Owners Manual: 120,000 miles (192,000 km) or 96 months
Rotating tires
Inspect vacuum hose
Inspect air conditioning refrigerant
Inspect brake hoses and lines
Inspect drive shafts and boots
Inspect exhaust pipe and muffler
Inspect front brake disc/pads, calipers
Inspect propeller shaft (AWD)
Inspect rear brake disc/pads
Inspect steeri ...
Hyundai Tucson (LM) 2010-2015 Owners Manual: Rear view camera
The system has been equipped with a rear view camera for user safety by
allowing a wider rear range of vision.
The rear view camera will automatically operate when the ignition key is
turned ON and the transmission lever is set to R.
The rear view camera will automatically stop operatin ...
