Hyundai Tucson: Convenient features of your vehicle / Fuel filler door
Opening the fuel filler door
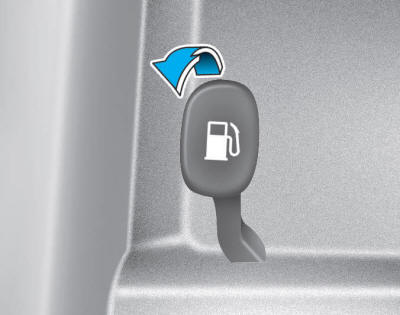
The fuel filler door must be opened from inside the vehicle by pulling up the fuel filler door opener lever.
1. Turn the engine off.
2. Pull the fuel filler door opener lever up located on the floor, left side of the driver’s seat.
âś˝ NOTICE
If the fuel filler door does not open because ice has formed around it, tap lightly or push on the door to break the ice and release the door. If necessary, spray around the door with an approved de-icer fluid (do not use radiator anti-freeze) or move the vehicle to a warm place and allow the ice to melt.
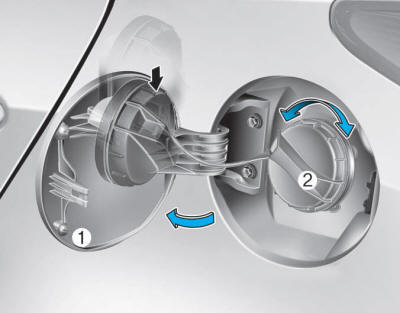
3. Pull the fuel filler door out (1) to fully open.
4. To remove the fuel tank cap (2), turn it counterclockwise. You may hear a hissing noise as the pressure inside the tank equalizes.
5. Place the cap on the fuel filler door.
Closing the fuel filler door
1. To install the fuel tank cap, turn it clockwise until it clicks one time.
2. Close the fuel filler door until it is latched securely.
If the Malfunction Indicator Light ( ) comes ON, turn the engine off and check or retighten the fuel filler cap until
it clicks once. If the Malfunction Indicator Light (
) comes ON, turn the engine off and check or retighten the fuel filler cap until
it clicks once. If the Malfunction Indicator Light ( )
does not go off, have your vehicle checked by your HYUNDAI dealer.
)
does not go off, have your vehicle checked by your HYUNDAI dealer.
WARNING
Gasoline is highly flammable and explosive. Failure to follow these guidelines may result in SERIOUS INJURY or DEATH:
- Read and follow all warnings posted at the gas station.
- Before refueling, note the location of the Emergency Gasoline Shut-Off, if available, at the gas station.
- Before touching the fuel nozzle, you should eliminate the potential build-up of static electricity by touching a metal part of the vehicle, a safe distance away from the fuel filler neck, nozzle, or other gas source, with your bare hand.
- Do not use cellular phones while refueling. Electric current and/or electronic interference from cellular phones can potentially ignite fuel vapors and cause a fire.
- Do not get back into a vehicle once you have begun refueling. You can generate a buildup of static electricity by touching, rubbing or sliding against any item or fabric capable of producing static electricity. Static electricity discharge can ignite fuel vapors causing a fire. If you must re-enter the vehicle, you should once again eliminate potentially dangerous static electricity discharge by touching a metal part of the vehicle, away from the fuel filler neck, nozzle or other gasoline source, with your bare hand.
- When using an approved portable fuel container, be sure to place the container on the ground prior to refueling. Static electricity discharge from the container can ignite fuel vapors causing a fire. Once refueling has begun, contact between your bare hand and the vehicle should be maintained until the filling is complete.
- Use only approved portable plastic fuel containers designed to carry and store gasoline. • When refueling, always move the shift lever to the P (Park) position, set the parking brake, and place the ignition switch to the LOCK/OFF position. Sparks produced by electrical components related to the engine can ignite fuel vapors causing a fire.
- Do not use matches or a lighter and do not smoke or leave a lit cigarette in your vehicle while at a gas station, especially during refueling.
- Do not over-fill or top-off your vehicle tank, which can cause gasoline spillage.
- If a fire breaks out during refueling, leave the vicinity of the vehicle, and immediately contact the manager of the gas station and then contact the local fire department. Follow any safety instructions they provide.
- If pressurized fuel sprays out, it can cover your clothes or skin and thus subject you to the risk of fire and burns. Always remove the fuel cap carefully and slowly. If the cap is venting fuel or if you hear a hissing sound, wait until the condition stops before completely removing the cap.
- Always check that the fuel cap is installed securely to prevent fuel spillage in the event of an accident.
âś˝ NOTICE
- Make sure to refuel your vehicle according to the "Fuel Requirements" suggested in the Introduction chapter.
- Do not spill fuel on the exterior surfaces of the vehicle. Any type of fuel spilled on painted surfaces may damage the paint.
CAUTION
If the fuel filler cap requires replacement, use only a genuine HYUNDAI cap or the equivalent specified for your vehicle. An incorrect fuel filler cap can result in a serious malfunction of the fuel system or emission control system.
 Emergency tailgate safety release
Your vehicle is equipped with an Emergency Tailgate Safety Release lever located
inside on the bottom of the tailgate. When someone is inadvertently locked in the
luggage compartment, the tail ...
 Lights
...
Other information:
Hyundai Tucson (LM) 2010-2015 Service Manual: Rear Shock Absorber Repair procedures
Replacement
1.
Remove the rear wheel & tire.the rear wheel & tire.
Tightening torque :
88.3 ~ 107.9N.m (9.0 ~ 11.0kgf.m, 65.1 ~ 79.6lb-ft)
Be careful not to damage to the hub bolts when removing the rear wheel & tire.
2.
Loosen the bolt & nut an ...
Hyundai Tucson (LM) 2010-2015 Service Manual: Components and Components Location
Component Location
1. Rear wiper motor assembly2. Motor support3. Rubber pad4. Liftgate glass hole5. Pad cap6. HEX nut7. Cover8. Rear wiper arm & blade9. Rear wiper arm nut10. Head cap11. Rear wiper motor bolt12. Bushing
...
