Hyundai Tucson: Interior / Quarter Fixed Glass Repair procedures
| Removal |
|

| 1. |
Remove the following parts
|
| 2. |
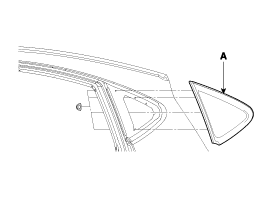
Loosen the quarter fixed glass (A) mounting nut.
|
| 3. |
Cut out the quarter fixed glass sealant using the utility knife.
|
| 4. |
Remove the quarter fixed glass. |
| Installation |
| 1. |
With a putt knife, scrape the old adhesive smooth to a
thickness of about 2mm (0.08 in.) on the bonding surface around the
entire quarter fixed glass flange.
|
| 2. |
Clean the body bonding surface with a sponge dampened in
alcohol. After cleaning, keep oil, grease and water from getting on the
surface. |
| 3. |
With a sponge, apply a light coat of glass primer along the
edge of the quarter fixed glass as shown, then lightly wipe it off with
gauze or cheese cloth :
|
| 4. |
With a sponge, apply a light coat of body primer to the
original adhesive remaining around the flange. Let the body primer dry
for at least 10 minutes.
|
| 5. |
Pack adhesive into the cartridge without air pockets to
ensure continuous delivery. Put the cartridge in a caulking gun, and run
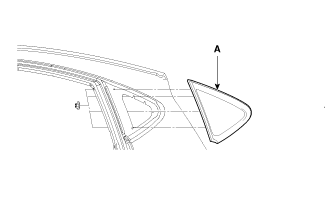
a bead of sealant around the edge of the quarter fixed glass (A) as
shown. Apply the adhesive within 30 minutes after applying the glass
primer. Make a slightly thicker bead at each corner.
|
| 6. |
Install the quarter fixed glass. |
| 7. |
Let the adhesive dry for at least one hour, then spray water
over the quarter fixed glass and check for leaks. If a leak occurs, let
it dry, then seal with sealant :
|
| 8. |
Reinstall all remaining removed parts. |
| 9. |
Installation the following items.
|
 Windshield Glass Repair procedures
Removal
•
Put on gloves to protect your hands.
•
Use seat covers to avoid damaging any surfaces.
1.
Remove the following items.
A.
Front pillar trim
(Ref ...
 Bumper
...
Other information:
Hyundai Tucson (LM) 2010-2015 Service Manual: Camshaft Position Sensor (CMPS) Description and Operation
Description
Camshaft Position Sensor (CMPS) is a hall sensor and detects the camshaft position by using a hall element.
It is related with Crankshaft Position Sensor (CKPS) and
detects the piston position of each cylinder which the CKPS can't
detect.
The CMPS is installed on engine head cov ...
Hyundai Tucson (LM) 2010-2015 Owners Manual: Curtain air bags
Curtain air bags are located along both sides of the roof rails above the front
and rear doors.
They are designed to help protect the heads of the front seat occupants and the
rear outboard seat occupants in certain side impact collisions.
The curtain air bags are designed to deploy only dur ...
