Hyundai Tucson: Audio / Audio Unit Components and Components Location
Hyundai Tucson (LM) 2010-2015 Service Manual / Body Electrical System / Audio / Audio Unit Components and Components Location
| Components |
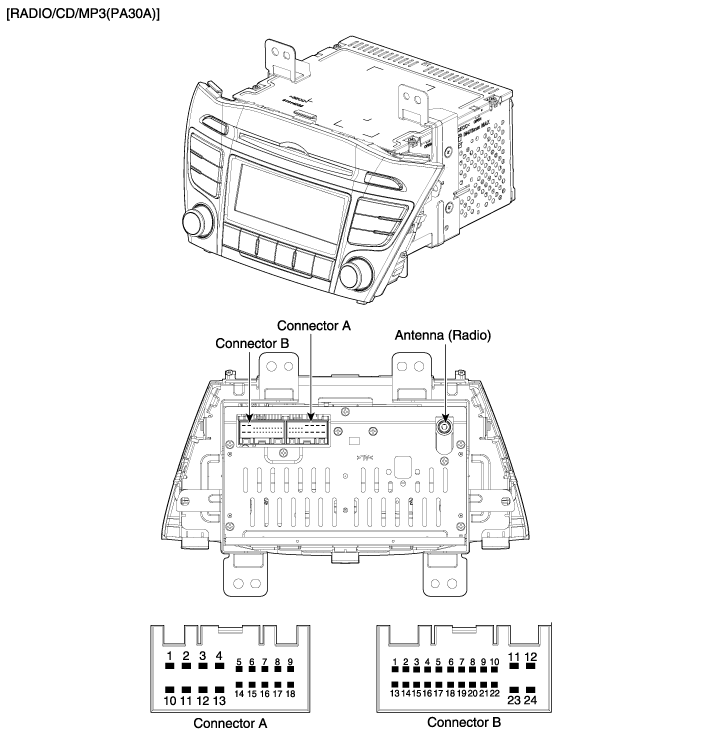
Connector Pin Information
| No. | Connector A | Connector B |
| 1 | Rear left speaker (+) | CAN High |
| 2 | Front left speaker (+) | - |
| 3 | Front right speaker (+) | - |
| 4 | Rear right speaker (+) | Steering wheel remote |
| 5 | - | - |
| 6 | - | USB D (+) |
| 7 | Ignition | USB/iPod VDD |
| 8 | Illumination (+) | AUX R IN |
| 9 | Detent | AUX GND |
| 10 | Rear left speaker (-) | Mic (+) B/T |
| 11 | Front left speaker (-) | ACC |
| 12 | Front right speaker (-) | B+ |
| 13 | Rear right speaker (-) | CAN Low |
| 14 | - | - |
| 15 | - | - |
| 16 | - | Speed |
| 17 | Illumination (-) | Remote GND |
| 18 | Remote antenna | USB D (-) |
| 19 | x | USB/iPod GND |
| 20 | AUX DETECT | |
| 21 | AUX L IN | |
| 22 | Mic (-) B/T | |
| 23 | - | |
| 24 | Power GND |
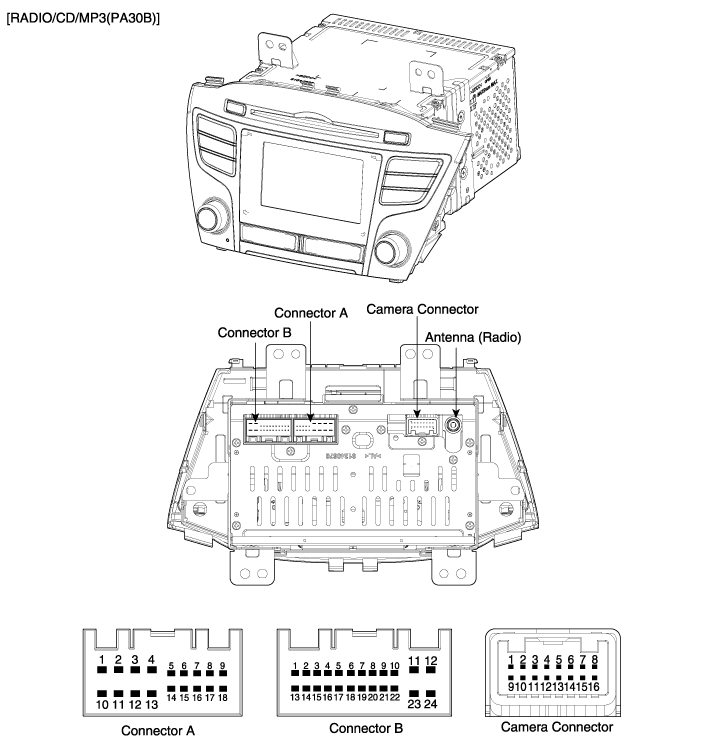
Connector Pin Information
| No. | Connector A | Connector B | Connector C |
| 1 | Rear left speaker (+) | - | - |
| 2 | Front left speaker (+) | - | - |
| 3 | Front right speaker (+) | - | Camera ground |
| 4 | Rear right speaker (+) | Steering wheel remote | Camera video input |
| 5 | - | - | - |
| 6 | - | USB D (+) | - |
| 7 | Ignition | USB/iPod VDD | - |
| 8 | Illumination (+) | AUX R IN | - |
| 9 | Detent | AUX GND | - |
| 10 | Rear left speaker (-) | Mic (+) B/T | Camera battery (+) |
| 11 | Front left speaker (-) | ACC | Parking ground |
| 12 | Front right speaker (-) | B+ | P detector |
| 13 | Rear right speaker (-) | - | - |
| 14 | - | - | - |
| 15 | - | Autolight | - |
| 16 | - | Speed | - |
| 17 | Illumination (-) | Remote GND | x |
| 18 | Remote antenna | USB D (-) | |
| 19 | x | USB/iPod GND | |
| 20 | AUX DETECT | ||
| 21 | AUX L IN | ||
| 22 | Mic (-) B/T | ||
| 23 | - | ||
| 24 | Power GND |
 Components and Components Location
Component Location
1. Audio unit2. Tweeter speaker3. Antenna cable connector4. Roof antenna (Radio)5. Front door speaker6. Rear door speaker7. Sub woofer speaker8. Antenna feeder cable9. External ...
 Audio Unit Repair procedures
Removal
1.
Disconnect the negative (-) battery terminal.
2.
Remove the hazard lamp switch assembly (A).
Take care not to damage and scratch the hazard lamp switch assemb ...
Other information:
Hyundai Tucson (LM) 2010-2015 Service Manual: Direct Electro Hydraulic Actuator Coupling Components and Components Location
Component Location
1. Transaxle Assembly2. Transfer assembly3. Propeller shaft4. Coupling assembly
Components
1. Coupling assembly2. Input shaft3. Pressure sensor4. Extension wiring5. Oil hydraulic Motor(Actuator)
...
Hyundai Tucson (LM) 2010-2015 Service Manual: Rheostat Repair procedures
Inspection
1.
Disconnect the negative (-) battery terminal.
2.
Remove the crash pad lower panel.
(Refer to the BD group - "Crash pad")
3.
Remove the crash pad side switch assembly (A) as shown below picture.
Put on gloves to protect your hands.
4.
Remove th ...
© 2010-2026 www.htmanual.net
