Hyundai Tucson: Exterior / Body Side Moldings Repair procedures
Roof Rack Replacement
| âą |
When prying with a flat-tipped screwdriver, wrap it with
protective tape, and apply protective tape around the related parts, to
prevent damaged. |
| âą |
Put on gloves to protect your hands. |
| âą |
Take care not to scratch the body surface. |
|
| 1. |
Using a screwdriver or remover, remove the roof rack cover (A). |
| 2. |
After loosening the mounting nuts, then remove the roof rack (B). 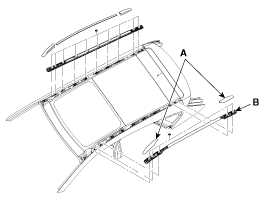
|
| 3. |
Install in the reverse order of removal. |
Roof Molding Replacement
| âą |
When prying with a flat-tipped screwdriver, wrap itwith
protective tape, and apply protective tapearound the related parts, to
prevent damaged. |
| âą |
Put on gloves to protect your hands. |
| âą |
Take care not to scratch the body surface. |
|
| 2. |
Using a screwdriver or remover, remove the roof molding (A). 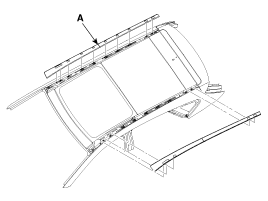
|
| 3. |
Install in the reverse order of removal.
| âą |
Replace any damage clips. |
|
|
Tailgate Garnish Replacement
| âą |
When prying with a flat-tipped screwdriver, wrap it with
protective tape, and apply protective tape around the related parts, to
prevent damaged. |
| âą |
Put on gloves to protect your hands. |
| âą |
Take care not to scratch the body surface. |
|
| 1. |
Remove the tail gate trim.
(Refer to Exterior - "Tailgate") |
| 2. |
Disconnect the connector (A). 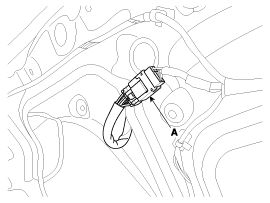
|
| 3. |
After loosening the mounting nuts, then remove the tailgate garnish (A). 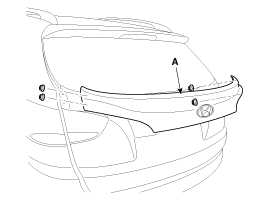
|
| 4. |
Install in the reverse order of removal.
| âą |
Replace any damage clips. |
|
|
Rear Spoiler Replacement
| âą |
When prying with a flat-tipped screwdriver, wrap itwith
protective tape, and apply protective tapearound the related parts, to
prevent damaged. |
| âą |
Put on gloves to protect your hands. |
| âą |
Take care not to scratch the body surface. |
|
| 1. |
Remove the tailgate trim.
(Refer to Exterior - "Tailgate") |
| 2. |
After loosening the mounting nuts, then remove the rear spoiler (A) 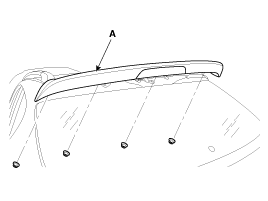
|
| 3. |
Disconnect the connector (A) and washer nozzle (B). 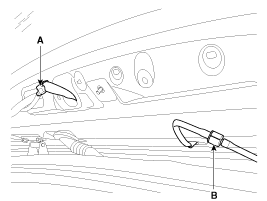
|
| 4. |
Install in the reverse order of removal.
| âą |
Replace any damage clips |
|
|
Door Side Garnish Replacement
| âą |
When prying with a flat-tipped screwdriver, wrap itwith
protective tape, and apply protective tapearound the related parts, to
prevent damaged. |
| âą |
Put on gloves to protect your hands. |
| âą |
Take care not to scratch the body surface |
|
| 1. |
Using a screwdriver or remover, remove the front door garnish (A). |
| 2. |
Using a screwdriver or remover, remove the rear door garnish (B). 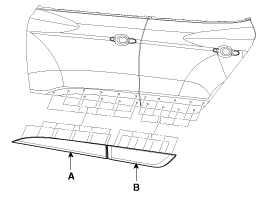
|
| 3. |
Install in the reverse order of removal.
| âą |
Replace any damage clips |
|
|
Side Sill Garnish Replacement
| âą |
When prying with a flat-tipped screwdriver, wrap itwith
protective tape, and apply protective tapearound the related parts, to
prevent damaged. |
| âą |
Put on gloves to protect your hands. |
| âą |
Take care not to scratch the body surface. |
|
| 1. |
Loosen the mounting screws. |
| 2. |
Using a screwdriver or remover, remove the side sill garnish (A). |
| 3. |
Install in the reverse order of removal.
| âą |
Replace any damage clips |
|

|
Replacement
Door Trim Replacement
âą
When prying with a flat-tipped screwdriver, wrap it with
protective tape, and apply protective tape around the related parts, to
...
Components
1. Panoramaroof frame2. Tilt lever assembly3. Glass4. Wind deflector 5. Front fixed glass6. Motor7. Mechanism rail assembly8. Impact cross member assembly9. E.M.C metal sheet10. Sunroo ...
Other information:
Hyundai Tucson (LM) 2010-2015 Owners Manual: Tire sidewall labeling
This information identifies and describes the fundamental characteristics
of the tire and also provides the tire identification number (TIN) for safety standard
certification. The TIN can be used to identify the tire in case of a recall.
1. Manufacturer or brand name
Manufacturer or brand na ...
Hyundai Tucson (LM) 2010-2015 Owners Manual: iPodÂź Mode
✠NOTICE - USING THE iPodÂź DEVICE
iPodÂź is a registered trademark of Apple Inc.
In order to use the iPodÂź while operating the keys, you must use a dedicated
iPodÂź cable. (the cable that is supplied when purchasing iPodÂź/iPhoneÂź products)
If the iPodÂź is connected to the vehicle w ...

 Rear Door Repair procedures
 Panoramaroof Components and Components Location