Hyundai Tucson: Driveshaft Assembly / Dynamic Damper Repair procedures
Hyundai Tucson (LM) 2010-2015 Service Manual / Driveshaft and axle / Driveshaft Assembly / Dynamic Damper Repair procedures
| Removal |
| 1. |
Remove the front driveshaft.
(Refer to Driveshaft Assembly - ŌĆ£Front DriveshaftŌĆØ) |
| 2. |
Remove the TJ joint assembly.
(Refer to Driveshaft Assembly - ŌĆ£TJ JointŌĆØ) |
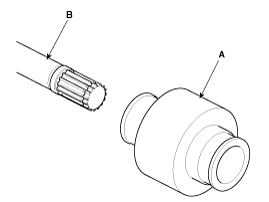
| 3. |
Remove the remove the both side of band (B) of the dynamic damper (A).
|

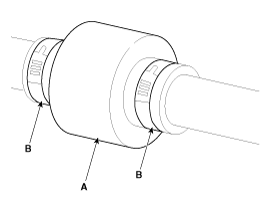
| 4. |
Fix the driveshaft (A) with a vice (B) as illustrated.
|

| 5. |
Apply soap powder on the shaft to prevent being damaged
between the shaft spline and the dynamic damper when the dynamic damper
is removed. |
| 6. |
Seperate the dynamic damper (A) from the shaft (B) carefully.
|
| Installation |
| 1. |
Apply soap powder on the shaft to prevent being damaged between the shaft spline and the dynamic damper. |
| 2. |
Install the dynamic damper. |
| 3. |
Install the dynamic damper band (A). |
| 4. |
Using the SST(09495-3K000), secure the TJ boot bands (B).
|
| 5. |
Install the TJ joint assembly.
(Refer to Driveshaft Assembly - ŌĆ£TJ jointŌĆØ) |
| 6. |
Install the front driveshaft.
(Refer to Driveshaft Assembly - ŌĆ£Front DriveshaftŌĆØ) |
| 7. |
Check the front alignment.
(Refer to Suspension System - "Front Alignment") |
 Dynamic Damper Components and Components Location
Components
1. BJ assembly2. BJ circlip3. BJ boot band4. BJ boot5. Dynamic damper band6. Dynamic damper7. Shaft8. TJ boot band9. TJ boot10. Spider assembly11. Retainer ring12. TJ housing13. Housin ...
 BJ Boot Components and Components Location
Components
1. BJ assembly2. BJ circlip3. BJ boot band4. BJ boot5. Dynamic damper band6. Dynamic damper7. Shaft8. TJ boot band9. TJ boot10. Spider assembly11. Retainer ring12. TJ housing13. Housin ...
Other information:
Hyundai Tucson (LM) 2010-2015 Service Manual: Smart Key Repair procedures
Smart Key
Smart Key Code Saving
1.
Connect the DLC cable of GDS to the data link connector (16 pins) in driver side crash pad lower panel, turn the power on GDS.
2.
Select the vehicle model and then do "Smart key code saving".
3.
After selecting "Smart key teaching" menu, push "Enter" k ...
Hyundai Tucson (LM) 2010-2015 Owners Manual: Finish maintenance
Washing
To help protect your vehicleŌĆÖs finish from rust and deterioration, wash it thoroughly
and frequently at least once a month with lukewarm or cold water.
If you use your vehicle for off-road driving, you should wash it after each off-road
trip. Pay special attention to the removal of a ...
┬® 2010-2026 www.htmanual.net
