Hyundai Tucson: Parking Brake System / Parking Brake Assembly Repair procedures
Hyundai Tucson (LM) 2010-2015 Service Manual / Brake System / Parking Brake System / Parking Brake Assembly Repair procedures
| Removal |
Parking Brake Pedal [Foot type]
| 1. |
Remove the crash pad lower panel.
(Refer to Body - "Crash Pad") |
| 2. |
Remove the junction box.
(Refer to Body Electrical System - "Fuses and Relays") |
| 3. |
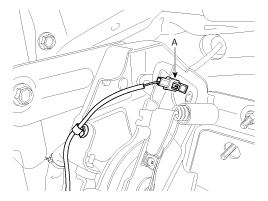
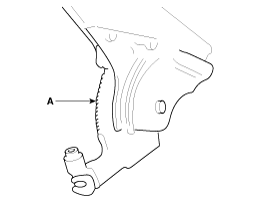
Disconnect the parking brake switch connector (A).
|
| 4. |
Remove the parking brake pedal mounting bolts (A) and nut.(B)
|
| 5. |
Remove the parking brake cable mounting bolts. |
| 6. |
Remove the parking brake cable adjusting nut (A) and the fixing clip (B), and then remove the parking brake pedal.
|
| 7. |
Remove the floor console.
(Refer to Body - "Console") |
| 8. |
Remove the floor console bracket.
|
| 9. |
Remove the paring brake cable fixing clip (A) and bolts.
|
| 10. |
Loosen the adjusting nut (A) and then remove the front parking brake cable.
|
| 11. |
Raise the vehicle, and make sure it is securely supported. |
| 12. |
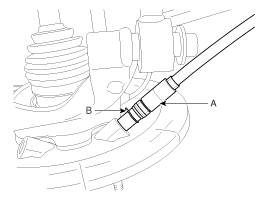
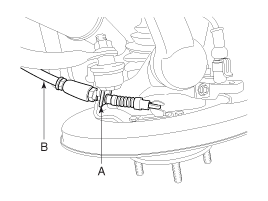
Remove the parking brake cable (A) after removing the retaining ring (B).
|
| 13. |
Loosen the parking brake cable bracket bolts and remove the rear parking brake cable. |
Parking Brake Lever [Hand type]
| 1. |
Remove the floor console.
(Refer to Body - "Console") |
| 2. |
Remove the floor console bracket.
|
| 3. |
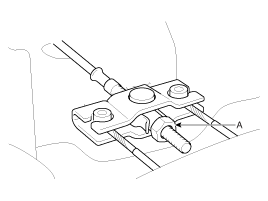
Disconnect the connector (A) of parking brake switch. |
| 4. |
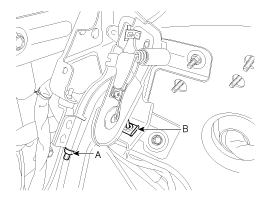
Loosen the adjusting nut (A) and the parking brake cables.
|
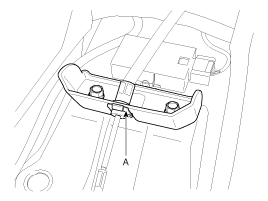
| 5. |
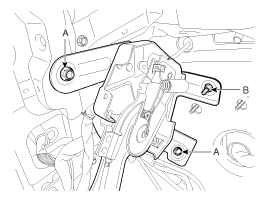
Remove the parking brake lever assembly after removing the 4 bolts (A) as shown below.
|

| 6. |
Raise the vehicle and make sure it is securely supported. |
| 7. |
Remove the parking brake cable (A) after removing the retaining (B).
|
| 8. |
Loosen the parking brake cable braket bolts and remove the parking brake cable. |
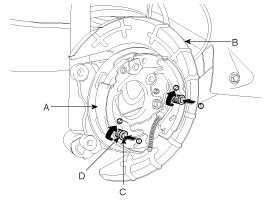
Parking Brake Shoe [2WD]
| 1. |
Raise the vehicle, and make sure it is securely supported. |
| 2. |
Remove the rear tire and wheel. |
| 3. |
Remove the rear brake caliper and Rear disc brake.
(Refer to "Rear disc brake removal") |
| 4. |
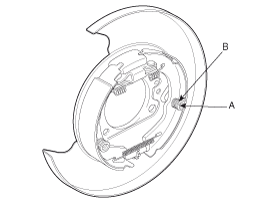
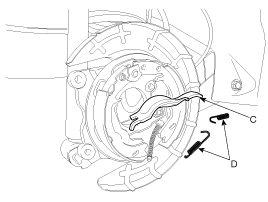
Remove the parking brake cable (B), after removing the clip (A).
|
| 5. |
Remove the shoe hold down pin (A) and the spring (B) by pressing and rotating the spring.
|
| 6. |
Remove the adjuster assembly (B) and the lower return spring (A).
|
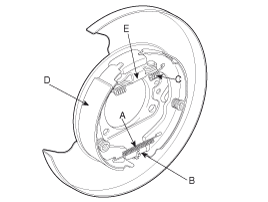
| 7. |
Remove the upper return spring (C) and the brake shoes (D). |
| 8. |
Remove the operating lever assembly (E). |
Parking Brake Shoe [4WD]
| 1. |
Raise the vehicle, and make sure it is securely supported. |
| 2. |
Remove the rear tire and wheel, then remove the brake caliper.
(Refer to "Rear disc brake removal") |
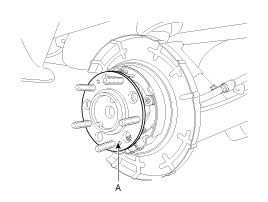
| 3. |
Remove the rear brake disc by loosening the screws (A).
|
| 4. |
Remove the rear hub unit bearing (A).
|
| 5. |
Remove the shoe hold down pin (A) and the spring (B) by pushing the retainer spring and turning the pin.
|
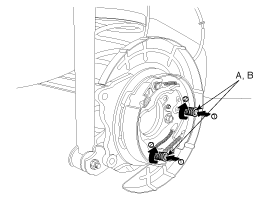
| 6. |
Remove the adjuster assembly (A) and the return spring (B).
|
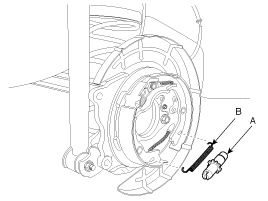
| 7. |
Remove the parking brake cable (B) from the brake shoe (A).
|
| 8. |
Remove the strut (C) and the strut spring (D).
|
| 9. |
Remove the brake shoe. |
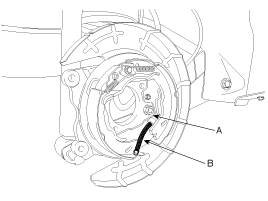
| 10. |
Remove the parking brake cable retaining (B), from the parking brake cable (A).
|
| Installation |
Parking Brake Shoe [2WD]
| 1. |
Install the operating lever assembly (E).
|

| 2. |
Install the upper return spring (C) and the brake shoes (D). |
| 3. |
Install the adjuster assembly (B) and the lower return spring (A).
|
| 4. |
Install the shoe hold down pin (A) and spring (B) by pressing and rotating the spring.
|

| 5. |
Install the parking brake cable (B), then install the clip (A).
|
| 6. |
Install the rear brake disc, then adjust the rear brake shoe clearance.
|
| 7. |
Install the brake caliper assembly.
(Refer to "Rear brake installation") |
| 8. |
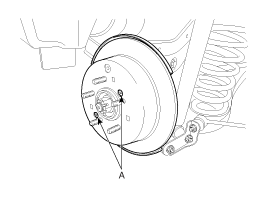
Install the tire and wheel, after installing the plug on the disc. |
| 9. |
If the parking brake shoe or the brake disc are replaced a newly one, perform the brake shoe bed-in procedure.
|

Parking Brake Shoe [4WD]
| 1. |
Install the brake shoe (A) to the back plate (B).
|
| 2. |
Install the shoe hold down pin (C) and the spring (D) by pushing the retainer spring (D) and turning the pins. |
| 3. |
After installing the strut (A) and upper return spring (B), install the adjuster assembly (C) and the lower return spring (D).
|
| 4. |
Install the parking brake cable (A), then install the retaining (B).
|
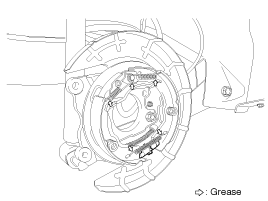
| 5. |
Apply a coating of the specified grease to each sliding parts of parking brake as shown.
|
| 6. |
Install the rear brake disc, then adjust the rear brake shoe clearance.
|
| 7. |
Install the brake caliper.
(Refer to "Rear brake installation") |
| 8. |
Install the tire and wheel. |
| 9. |
If the parking brake shoe or the brake disc are replaced a newly one, perform the brake shoe bed-in procedure.
|
Parking Brake Lever [Hand Type]
| 1. |
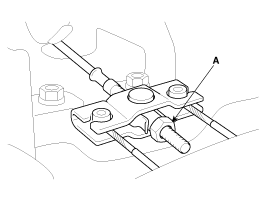
Install the parking brake lever assembly, then tighten the mounting bolts (A).
|
| 2. |
Apply a coating of the specified grease to each sliding parts (A) of the ratchet plate or the ratchet pawl.
|
| 3. |
Install the parking brake cable adjuster, then adjust the parking brake lever stroke by turning adjusting nut (A).
|
| 4. |
Release the parking brake lever fully, and check that parking
brakes do not drag when the rear wheels are turned. Readjust if
necessary. |
| 5. |
Make sure that the parking brakes are fully applied when the parking brake lever is pulled up fully. |
| 6. |
Reconnect the connector of parking brake switch.
|
| 7. |
Install the floor console.
(Refer to Body - "Floor Console") |
Parking Brake Pedal [Foot type]
| 1. |
Install the parking brake cable. |
| 2. |
Install the holding clip (B) and the cable adjusting nut (A) after fixing the parking brake cable.
|
| 3. |
Install the parking brake pedal, and then install the parking brake pedal mounting bolts (A) and nut (B).
|
| 4. |
Adjust the parking brake pedal stroke by turning the adjusting nut (A).
|
| 5. |
Reconnect the parking brake switch connector (A).
|
| 6. |
Install the juncting box.
(Refer to Body Electrical System - "Fuses and Relays") |
| 7. |
Install the crash pad lower panel.
(Refer to Body - "Crash Pad") |
| Adjustment |
Parking Brake Shoe Clearance Adjustment
| 1. |
Raise the vehicle, and make sure it is securely supported. |
| 2. |
Remove the rear tire and wheel. |
| 3. |
Remove the plug from the disc.
|

| 4. |
Rotate the toothed wheel of adjuster by a screw driver until
the disc is not moving, and then return it by 4 notches in the opposite
direction. |
| 5. |
Install the rear wheel & tire after installing the plug on the disc. |
Parking Brake Pedal Stroke Adjustment
| 1. |
Operate the parking brake pedal through a full stroke over 3 times for setting the parking cables. |
| 2. |
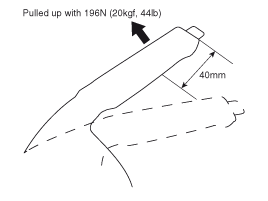
Adjust the adjusting nut (A) for parking barke pedal stoke 4 notches when operating effort is 196N(20kgf, 44lbf)
|
Parking Brake Lever Stroke Adjustment
| 1. |
Raise the vehicle, and make sure it is securely supported. |
| 2. |
Remove the floor console pad. |
| 3. |
Adjust the parking brake lever stroke by turning adjusting nut (A).
|
| 4. |
Release the parking brake lever fully, and check that parking
brakes do not drag when the rear wheels are turned. Readjust if
necessary. |
| 5. |
Make sure that the parking brakes are fully applied when the parking brake lever is pulled up fully. |
| 6. |
Install the floor console. |
 Parking Brake Assembly Components and Components Location
Components (1)
1. Parking brake pedal2. Front parking brake cable (Foot type olny)3. Equalizer assembly4. Rear parking brake cable5. Parking brake lever assembly
Components (2)
1. Back plat ...

Other information:
Hyundai Tucson (LM) 2010-2015 Service Manual: Fuel Tank Air Filter Repair procedures
Replacement
1.
Turn the ignition switch OFF and disconnect the battery negative (-) cable.
2.
Lift the vehicle with a jack.
3.
Disconnect the canister close valve connector (A).
4.
Disconnect the ventilation hose (B) and vapor hose (C).
5.
Remove the fuel tank air filter and cani ...
Hyundai Tucson (LM) 2010-2015 Service Manual: Interior Trim Repair procedures
Replacement
Door Scuff Trim Replacement
•
Put on gloves to protect your hands.
•
When prying with a flat-tip screwdriver, wrap it with protective tape to prevent damage.
•
Take care not to bend or scratch the trim and panels.
1.
Remove the door sc ...
© 2010-2026 www.htmanual.net
