Hyundai Tucson: Clutch System / Clutch Release Cylinder Repair procedures
| Removal |
| 1. |
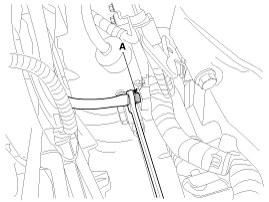
Drain the brake fluid through the bleed plug (A).
|
| 2. |
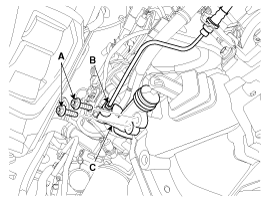
Remove the clutch release cylinder assembly (C) after removing thd tube (B) and bolts (A-2ea).
|
| Installation |
| 1. |
Installation is the reverse of removal.
|
| Adjustment |
| Clutch Release Cylinder Air Bleeding Procedure |
Use the specified fluid. Avoid mixing different brands of fluid. |
Specified fluid: SAE J1703 (DOT 3 or DOT 4) |
| 1. |
After disconnecting a cap from the clutch release cylinder air bleeder, insert a vinyl hose in the plug. |
| 2. |
Loosening the plug screw, press and release the clutch pedal about 10 times. |
| 3. |
Tighten the plug (A) during the clutch pedal pressed. Afterwards, raise the pedal with a hand. |
| 4. |
After pressing the clutch pedal 3 times more, loosen the plug
(A) and retighten it with the pedal pressed. Raise it again, then. |
| 5. |
Repeat the step 4 two or three times. (until there is no bubble in the fluid)
|
| 6. |
Refill the clutch master cylinder with the specified fluid. |
 Clutch Release Cylinder Components and Components Location
Components
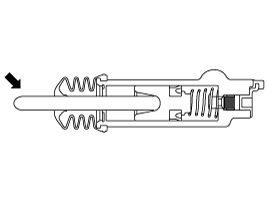
1. Union bolt2. Gasket3. Tube joint4. Clutch tube5. Valve plate6. Valve spring7. Bleeder screw8. Release cylinder9. Return spring10. Piston11. Boot12. Push rod
...
Other information:
Hyundai Tucson (LM) 2010-2015 Service Manual: Troubleshooting
Trouble Symptom Charts
Trouble Symptom 1
Trouble Symptom 2
Trouble symptomProbable causeRemedyThe set vehicle speed varies greatly upward or downward"Surging" (repeated alternating acceleration and deceleration) occurs after settingMalfunction of the vehicle speed sensor circuitRepair the veh ...
Hyundai Tucson (LM) 2010-2015 Owners Manual: Front seat warmers (if equipped)
While the engine is running, push either of the switches to warm the driver's
seat or front passenger's seat.
During mild weather or under conditions where the operation of the seat warmer
is not needed, keep the switches in the OFF position.
Each time you push the switch, the temperature ...


