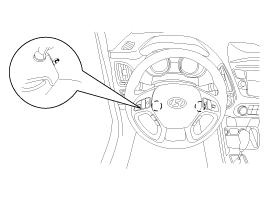
Hyundai Tucson: Airbag Module / Driver Airbag (DAB) Module and Clock Spring Repair procedures
Hyundai Tucson (LM) 2010-2015 Service Manual / Restraint / Airbag Module / Driver Airbag (DAB) Module and Clock Spring Repair procedures
| Removal |
| 1. |
Disconnect the battery negative cable and wait for at least three minutes before beginning work. |
| 2. |
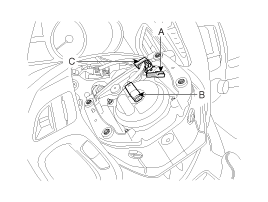
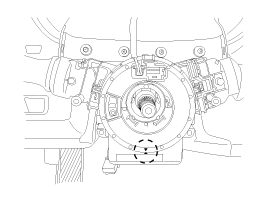
Remove the airbag module mounting bolts (2EA).
|
| 3. |
Remove the wiring fixing clip (C) and disconnect the horn connector (A).
|
| 4. |
Release the connector locking pin, then disconnect the driver airbag module connector (B).
|

| 5. |
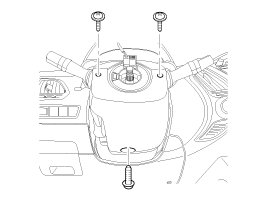
Remove the steering wheel and steering wheel column cover. (Refer to the Steering System group- Steering Column and Shaft)
|
| 6. |
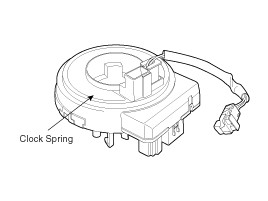
Disconnect the clock spring and horn connector, then remove the clock spring.
|

| Inspection |
| Driver Airbag (DAB) |
If any improper parts are found during the following inspection, replace the airbag module with a new one.
Never attempt to measure the circuit resistance of the airbag
module (squib) even if you are using the specified tester. If the
circuit resistance is measured with a tester, accidental airbag
deployment will result in serious personal injury. |
| 1. |
Check pad cover for dents, cracks or deformities. |
| 2. |
Check the airbag module for denting, cracking or deformation. |
| 3. |
Check hooks and connectors for damage, terminals for deformities, and harness for binds. |
| 4. |
Check airbag inflator case for dents, cracks or deformities.
|
| 5. |
Install the airbag module to the steering wheel to check for fit or alignment with the wheel. |
Clock Spring
| 1. |
If, as a result of the following checks, even one abnormal point is discovered, replace the clock spring with a new one. |
| 2. |
Check connectors and protective tube for damage, and terminals for deformities.
|
| Installation |
| 1. |
Remove the ignition key from the vehicle. |
| 2. |
Disconnect the battery negative cable from battery and wait for at least three minutes before beginning work. |
| 3. |
Connect the clock spring harness connector and horn harness connector to the clock spring. |
| 4. |
Set the center position by setting the marks between the
clock spring and the cover into line. Make an array the mark (xx) by
turning the clock spring clockwise to the stop and then 2.0 revolutions
counterclockwise.
|
| 5. |
Install the steering wheel column cover and the steering wheel. (Refer to the Steering System group- Steering Column and Shaft) |
| 6. |
Connect the Driver Airbag (DAB) module connector and horn
connector, and then install the Driver Airbag (DAB) module on the
steering wheel. |
| 7. |
Secure the Driver Airbag (DAB) with the new mounting bolts.
|
| 8. |
Connect the battery negative cable. |
| 9. |
After installing the airbag, confirm proper system operation:
|
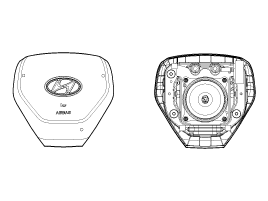
 Driver Airbag (DAB) Module and Clock Spring Components and Components Location
Components
1. Driver Airbag (DAB)2. Steering Wheel3. Clock Spring
...
 Passenger Airbag (PAB) Module Description and Operation
Description
The passenger airbag (PAB) is installed inside the crash pad
and protects the front passenger in the event of a frontal crash. The
SRSCM determines if and when to deploy the PAB.
...
Other information:
Hyundai Tucson (LM) 2010-2015 Owners Manual: Rear window defroster
The defroster heats the window to help remove frost, fog and thin ice from the
rear window, while the engine is running.
To activate the rear window defroster, press the rear window defroster button
located in the center facia switch panel. The indicator on the rear window defroster
butto ...
Hyundai Tucson (LM) 2010-2015 Service Manual: Specifications
Specifications
Manual transaxle typeM6CF4Engine type Gasoline 2.0 GDIGear ratio1st3.7692nd2.0803rd1.3874th1.0795th0.8846th0.744Reverse3.077Final gear ratio1st ~ 6th4.533Reverse5.231
Tightening Torques
ItemsN.mkgf.mlb-ftOil drain plug 58.9 ~ 78.56.0 ~ 8.043.4 ~ 57.8Oil filler plu ...
© 2010-2026 www.htmanual.net
