Hyundai Tucson: Power Door Locks / Power Door Lock Actuators Repair procedures
Hyundai Tucson (LM) 2010-2015 Service Manual / Body Electrical System / Power Door Locks / Power Door Lock Actuators Repair procedures
| Inspection |
Front Door Lock Actuator
| 1. |
Remove the front door trim.
(Refer to the BD group - "Front door") |
| 2. |
Remove the front door module.
(Refer to the BD group - "Front door") |
| 3. |
Disconnect the connectors from the actuator.
|
| 4. |
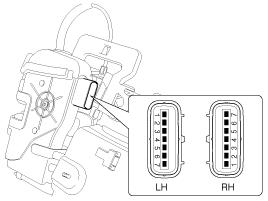
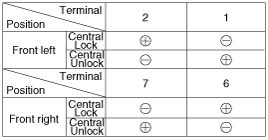
Check actuator operation by connecting power and ground
according to the table. To prevent damage to the actuator, apply battery
voltage only momentarily.
[Central Lock]
[Dead Lock]
|

Rear Door Lock Actuator
| 1. |
Remove the rear door trim.
(Refer to the BD group - "Rear door") |
| 2. |
Remove the rear door module.
(Refer to the BD group - "Rear door") |
| 3. |
Disconnect the connectors from the actuator.
|
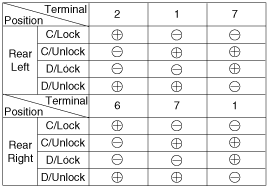
| 4. |
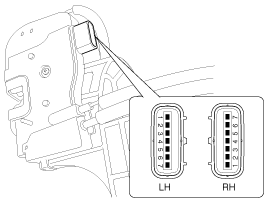
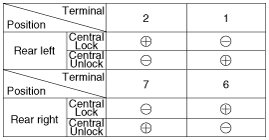
Check actuator operation by connecting power and ground
according to the table. To prevent damage to the actuator, apply battery
voltage only momentarily.
[Central Lock]
[Dead Lock]
|
Liftgate Lock Actuator Inspection
| 1. |
Remove the liftgate trim.
(Refer to the BD group - "Liftgate") |
| 2. |
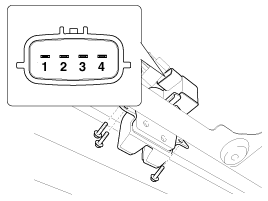
Disconnect the 4P connector from the actuator.
|
| 3. |
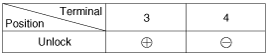
Check actuator operation by connecting power and ground
according to the table. To prevent damage to the actuator, apply battery
voltage only momentarily.
|
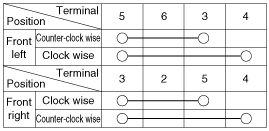
Front Door Lock Switch
| 1. |
Remove the front door trim.
(Refer to the BD group - "Front door") |
| 2. |
Remove the front door module.
(Refer to the BD group - "Front door") |
| 3. |
Disconnect the connectors from the actuator.
|
| 4. |
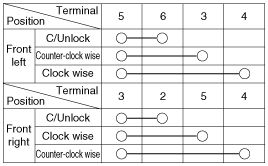
Check for continuity between the terminals in each switch position when inserting the key into the door according to the table.
[Central Lock]
[Dead Lock]
|
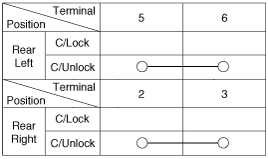
Rear Door Lock Switch
| 1. |
Remove the rear door trim.
(Refer to the BD group - "Rear door") |
| 2. |
Remove the rear door module.
(Refer to the BD group - "Rear door") |
| 3. |
Disconnect the connectors from the actuator.
|
| 4. |
Check for continuity between the terminals in each switch position according to the table.
[Central Lock]
|
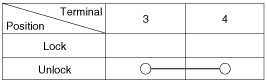
Liftgate Switch
| 1. |
Remove the liftgate trim.
(Refer to the BD group - "Liftgate") |
| 2. |
Disconnect the 4P connector from the actuator.
|
| 3. |
Check for continuity between the terminals in each switch position according to the table.
|
 Components and Components Location
Component Location
1. Driver power window switch2. Assist power window switch3. SJB (Smart Junction Box)4. Door lock switch5. Liftgate lock actuator & switch6. Front door lock actuator & ...
 Power Door Lock Switch Repair procedures
Removal
Driver Power Window Switch
1.
Disconnect the negative battery terminal.
2.
Remove the front door trim.
(Refer to the BD group - "Front door")
3.
Remove the screws from power wind ...
Other information:
Hyundai Tucson (LM) 2010-2015 Service Manual: Direct Electro Hydraulic Actuator Coupling Components and Components Location
Component Location
1. Transaxle Assembly2. Transfer assembly3. Propeller shaft4. Coupling assembly
Components
1. Coupling assembly2. Input shaft3. Pressure sensor4. Extension wiring5. Oil hydraulic Motor(Actuator)
...
Hyundai Tucson (LM) 2010-2015 Service Manual: Front Wheel Transfer Assembly Components and Components Location
Components Location
1. Transaxle Assembly2. Transfer assembly3. Propeller shaft4. Coupling assembly
...
© 2010-2026 www.htmanual.net
