
Hyundai Tucson: Power Windows / Power Window Motor Repair procedures
Hyundai Tucson (LM) 2010-2015 Service Manual / Body Electrical System / Power Windows / Power Window Motor Repair procedures
| Inspection |
Front Power Window Motor
| 1. |
Remove (-) negative battery terminal. |
| 2. |
Remove the front door trim.
(Refer to the BD group - "Front door") |
| 3. |
Disconnect the connector from the motor.
(A : Safety, B : Standard)
|
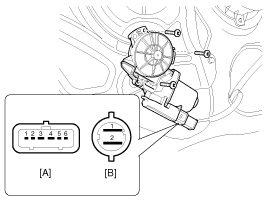
| 4. |
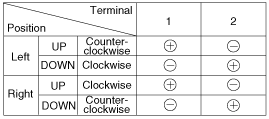
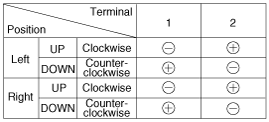
Connect the motor terminals directly to battery voltage (12V)
and check that the motor operates smoothly. Next, reverse the polarity
and check that the motor operates smoothly in the reverse direction. If
the operation is abnormal, replace the motor.
[Standard]
|
| 5. |
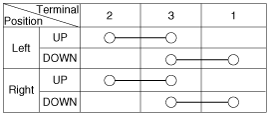
Connect the terminal No. 2 and No. 3 to battery voltage (12V)
and check that the motor operates smoothly when connecting the
terminals below.
[Safety]
|
Rear Power Window Motor
| 1. |
Remove (-) negative battery terminal. |
| 2. |
Remove the rear door trim.
(Refer to the BD group - "Rear door") |
| 3. |
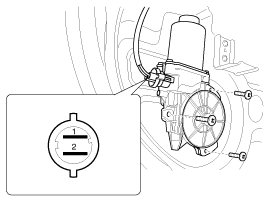
Disconnect the connector from the motor.
|
| 4. |
Connect the motor terminals directly to battery voltage (12V)
and check that the motor operates smoothly. Next, reverse the polarity
and check that the motor operates smoothly in the reverse direction. If
the operation is abnormal, replace the motor.
|
 Description and Operation
Operation
Function Of Safety Power Window
When all door (Front, Rear) power window auto-up switch is operated, safety function is activated.
1.
Safety function condition
When detect the force o ...
 Power Window Switch Components and Components Location
Components
Power Window Main Switch
Passenger Power Window Switch
Rear Power Window Switch
...
Other information:
Hyundai Tucson (LM) 2010-2015 Service Manual: Water pump Repair procedures
Removal and Installation
1.
Loosen the drain plug, and then drain the engine coolant. Remove the radiator cap to help drain the coolant faster.
2.
Remove the drive belt.
(Refer to Timing system in this group)
3.
Remove the water pump pulley (A).
Tightening torque:
9.8 ~ 11.8 N.m ( ...
Hyundai Tucson (LM) 2010-2015 Service Manual: Canister Close Valve (CCV) Schematic Diagrams
Circuit Diagram
(M/T)
(A/T)
...
В© 2010-2026 www.htmanual.net
