Hyundai Tucson: Cylinder Head Assembly / Cylinder Head Repair procedures
Hyundai Tucson (LM) 2010-2015 Service Manual / Engine Mechanical System / Cylinder Head Assembly / Cylinder Head Repair procedures
| Removal |
Engine removal is not required for this procedure.
|

|

| 1. |
Disconnect the battery negative terminal.
(Refer to Engine and transaxle assembly in this group) |
| 2. |
Remove the RH front wheel.
(Refer to Suspension System - “Wheel”) |
| 3. |
Remove the under cover.
(Refer to Engine and transaxle assembly in this group) |
| 4. |
Remove the engine cover.
(Refer to Engine and transaxle assembly in this group) |
| 5. |
Remove the air duct and the air cleaner assembly.
(Refer to Intake and exhaust system in this group) |
| 6. |
Loosen the drain plug, and drain the engine coolant. Remove the radiator cap to help drain the coolant faster.
(Refer to Cooling system in this group) |
| 7. |
Disconnect the radiator upper hose and lower hose.
(Refer to Cooling system in this group) |
| 8. |
Disconnect the wiring connectors and harness clamps, and then
remove the wiring and protectors from the cylinder head and the intake
manifold.
|
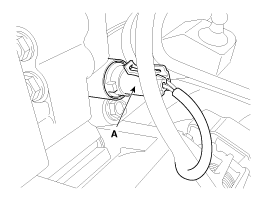
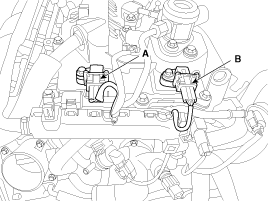
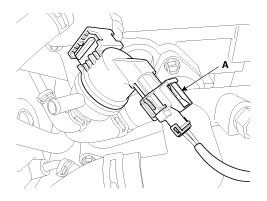
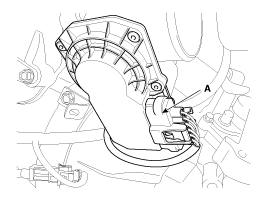
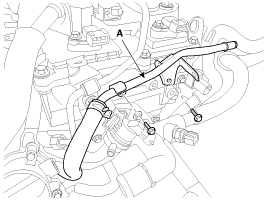
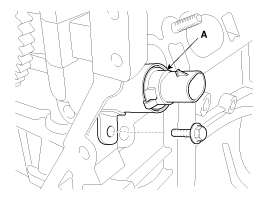
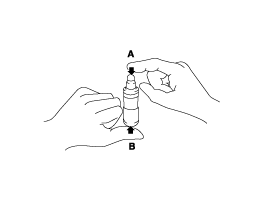
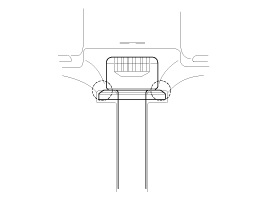
| 9. |
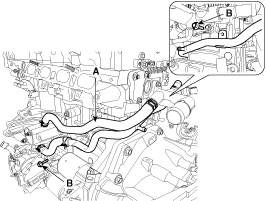
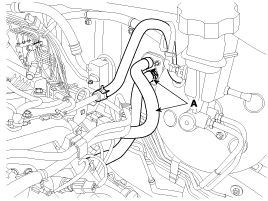
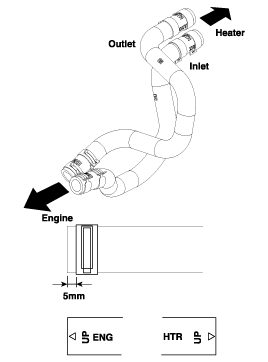
Disconnect the heater hoses (A).
|
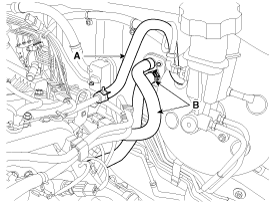
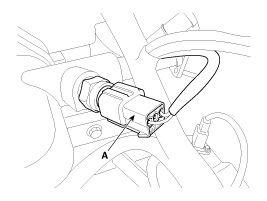
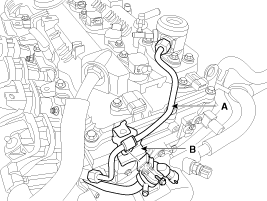
| 10. |
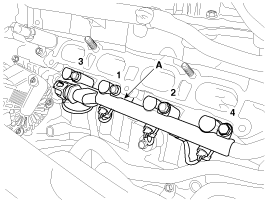
Disconnect the fuel hose (A) and PCSV (Purge control solenoid valve) hose (B).
|
| 11. |
Remove the intake and exhaust manifold.
(Refer to Intake and exhaust system in this group) |
| 12. |
Remove the timing chain including the drive belt, the cylinder head cover, the alternator and the timing chain cover.
(Refer to Timing system in this group) |
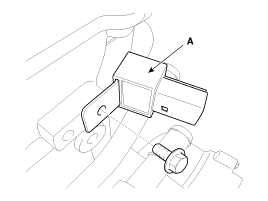
| 13. |
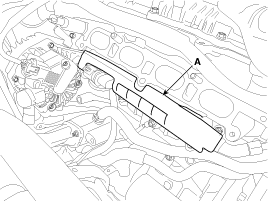
Remove the injector foam (A).
|
| 14. |
Remove the injector & rail assembly (A).
(Refer to Engine Control / Fuel System - "Injector")
|

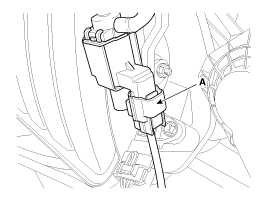
| 15. |
Remove the vacuum pipe (A).
|
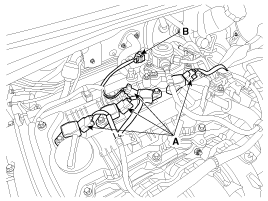
| 16. |
Remove the high pressure pipe (A) and the PCSV (Purge Control Solenoid Valve) bracket (B).
(Refer to Engine Control / Fuel System - "High Pressure Fuel Pump")
|
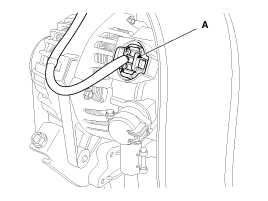
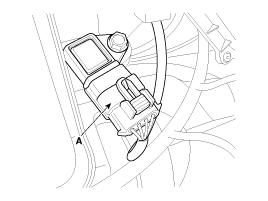
| 17. |
Remove the condenser (A).
|
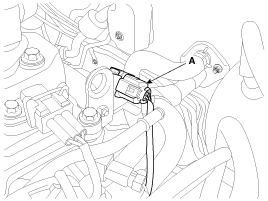
| 18. |
Remove the fuel pump adaptor assembly (A).
|
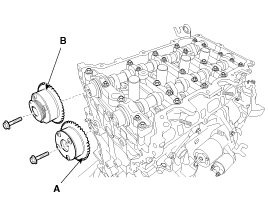
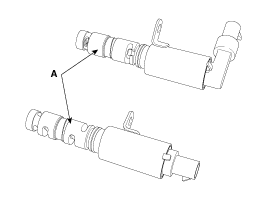
| 19. |
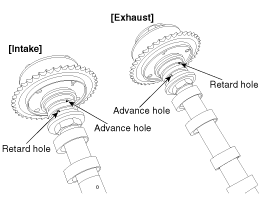
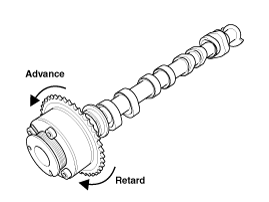
Remove the intake CVVT assembly (A) and exhaust CVVT assembly (B).
|
| 20. |
Remove the camshaft.
|

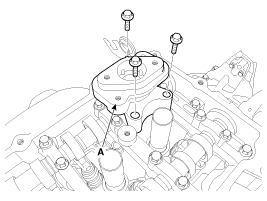
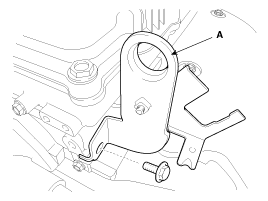
| 21. |
Remove the cam carrier (A).
|
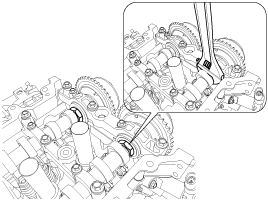
| 22. |
Remove the HLA (Hydraulic lash adjuster) (A) and the swing arm (B).
|
| 23. |
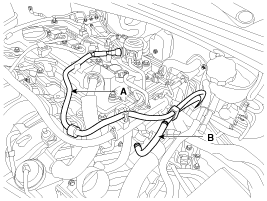
Disconnect the bypass hose (A). |
| 24. |
Unfasten the heater pipe mounting bolts (B).
|
| 25. |
Remove the water temperature control assembly.
(Refer to Cooling system in this group) |
| 26. |
Remove the oil control adapter (A) with the gasket (B).
|
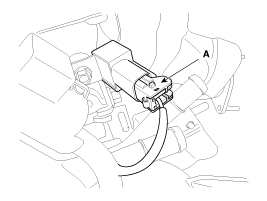
| 27. |
Remove the intake OCV (Oil control valve) (A).
|
| 28. |
Remove the exhaust OCV (Oil control valve) (A).
|
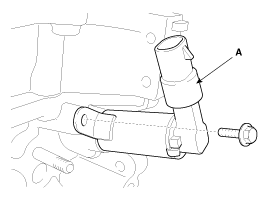
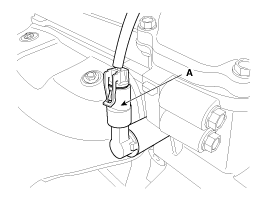
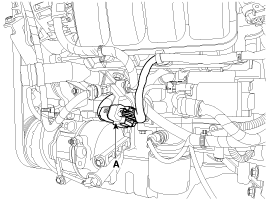
| 29. |
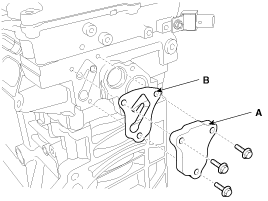
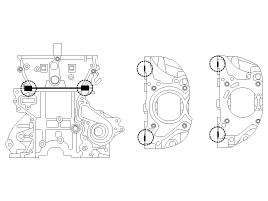
Remove the rear engine hanger (A).
|
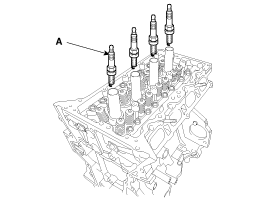
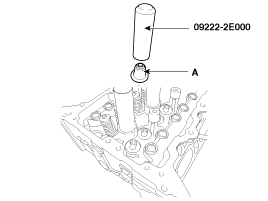
| 30. |
Remove the spark plugs (A).
(Refer to Engine Electrical System - “Ignition system”)
|
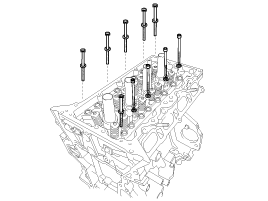
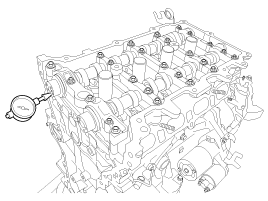
| 31. |
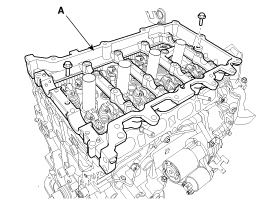
Remove the cylinder head.
|
| Disassembly |
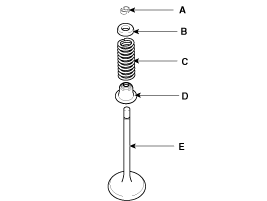
Identify, valves and valve springs as they are removed so that each item can be reinstalled in its original position. |
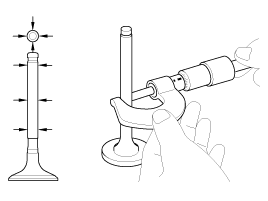
| 1. |
Remove the valves.
|
| Inspection |
Cylinder Head
| 1. |
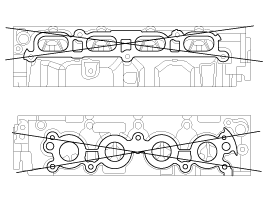
Inspect for flatness.
Using a precision straight edge and feeler gauge, measure the
contacting surface of the cylinder block and the manifolds for warpage.
|

| 2. |
Inspect for cracks.
Check the combustion chamber, intake ports, exhaust ports and
cylinder block surface for cracks. If cracked, replace the cylinder
head. |
Valve And Valve Spring
| 1. |
Inspect valve stems and valve guides.
|
| 2. |
Inspect the valves.
|
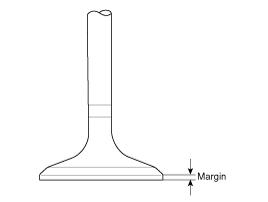
| 3. |
Inspect the valve seats and the valve guides.
|
| 4. |
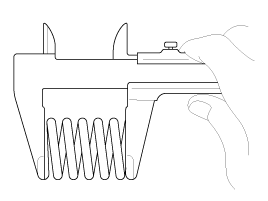
Inspect the valve springs.
|
Camshaft
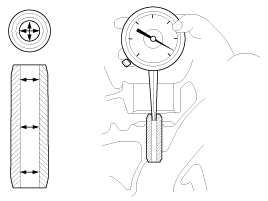
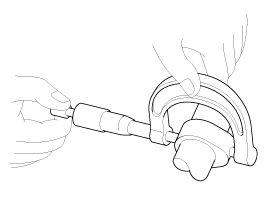
| 1. |
Inspect the cam lobes.
Using a micrometer, measure the cam lobe height.
If the cam lobe height is less than specification, replace the camshaft.
|
| 2. |
Check the surface of the camshaft journal for wear.
If the journal is worn excessively, replace the camshaft. |
| 3. |
Inspect the camshaft journal clearance.
|

| 4. |
Inspect the camshaft end play.
|
Continuously variable valve timing(CVVT) Assembly
| 1. |
Inspect the CVVT for smooth rotation.
|

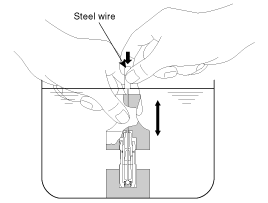
HLA (Hydraulic Lash Adjuster)
With the HLA filled with engine oil, hold A and press B by hand.
If B moves, replace the HLA.
| Problem | Possible cause | Action | |
| 1. Temporary noise when starting a cold engine | Normal | This noise will disappear after the oil in the engine reaches the normal pressure. | |
| 2. Continuous noise when the engine is started after parking more than 48 hours | Oil leakage of the high pressure chamber on the HLA, allowing air to get in | Noise will disappear within 15 minutes when engine runs at 2000-3000 rpm. If it doesn’t disappear, refer to step 7 below. | |
| 3. Continuous noise when the engine is first started after rebuilding cylinder head | Insufficient oil in cylinder head oil gallery | ||
| 4. Continuous noise when the engine is started after excessively cranking the engine by the starter motor or band |
| ||
| 5. Continuous noise when the engine is running after changing the HLA |
| ||
| 6. Continuous noise during idle after high engine speed | Engine oil level too high or too low |
| |
| Excessive amount of air in the oil at high engine speed | Check oil supply system. | ||
| Deteriorated oil | Check oil quality. If deteriorated, replace with specified type. | ||
| 7. Noise continues for more than 15 minutes | Low oil pressure | Check oil pressure and oil supply system of each part of engine. | |
| Faulty HLA | Remove the cylinder head cover and press HLA down by hand. If it moves, replace the HLA. | ||
| Reassembly |
|
| 1. |
Install the valves.
|
| Installation |
|
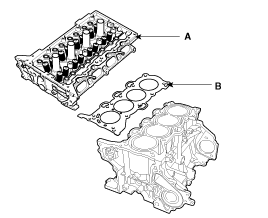
| 1. |
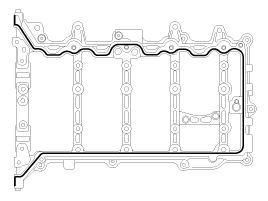
Install the cylinder head gasket (B) on the cylinder block.
|
| 2. |
Place the cylinder head (A) carefully to protect damage to the head gasket during installation.
|
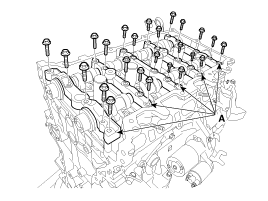
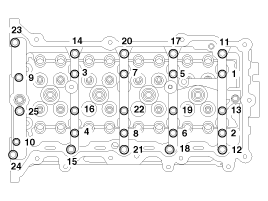
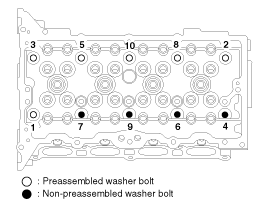
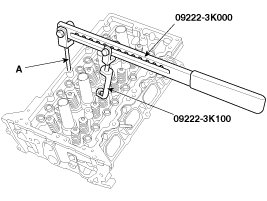
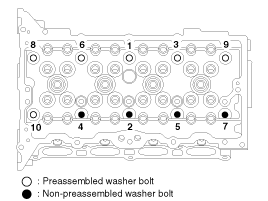
| 3. |
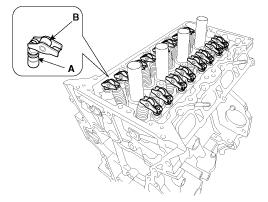
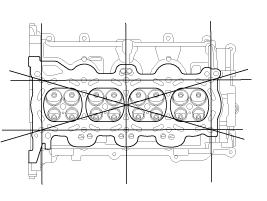
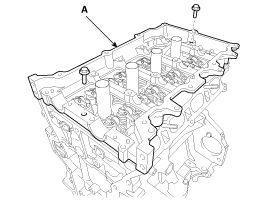
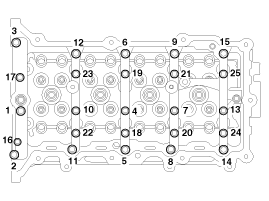
Install the cylinder head bolts with washers.
Using SST (09221-4A000), install and tighten the 10 cylinder head bolts, in several passes, in the sequence as shown.
|
| 4. |
Install the spark plugs (A).
(Refer to Engine Electrical System - “Ignition system”)
|
| 5. |
Install the rear engine hanger (A).
|
| 6. |
Install the exhaust OCV (Oil control valve) (A).
|
| 7. |
Install the intake OCV (Oil control valve) (A).
|
| 8. |
Install the oil control adapter (A) with a new gasket (B).
|
| 9. |
Install the water temperature control assembly.
(Refer to Cooling system in this group) |
| 10. |
Fasten the heater pipe mounting bolts (B).
|
| 11. |
Connect the bypass hose (A).
|
| 12. |
Install the HLA (Hydraulic lash adjuster)(A) and the swing arm (B).
|
| 13. |
Install the cam carrier.
|
| 14. |
Install the camshafts.
|
| 15. |
Install the intake CVVT assembly (A) and exhaust CVVT assembly (B).
|
| 16. |
Install the fuel pump adaptor assembly (A).
|
| 17. |
Install the condenser (A).
|
| 18. |
Install the high pressure pipe (A) and the PCSV (Purge Control Solenoid Valve) bracket (B).
(Refer to Engine Control / Fuel System - "High Pressure Fuel Pump")
|
| 19. |
Install the vacuum pipe (A).
|
| 20. |
Install the injector & rail assembly (A).
(Refer to Engine Control / Fuel System - “Injector”)
|
| 21. |
Install the injector foam (A).
|
| 22. |
Install the timing chain including the drive belt, the cylinder head cover, the alternator and the timing chain cover.
(Refer to Timing system in this group) |
| 23. |
Install the intake and exhaust manifold.
(Refer to Intake and exhaust system in this group) |
| 24. |
Connect the fuel hose (A) and PCSV (Purge control solenoid valve) hose (B).
|
| 25. |
Connect the heater hoses (A).
|
| 26. |
Install the wiring and protectors on the cylinder head and
the intake manifold and then connect the wiring connectors and harness
clamps.
|
| 27. |
Connect the radiator upper hose and lower hose.
(Refer to Cooling system in this group) |
| 28. |
Install the air duct and the air cleaner assembly.
(Refer to Intake and exhaust system in this group) |
| 29. |
Install the engine cover.
(Refer to Engine and transaxle assembly in this group) |
| 30. |
Install the under cover.
(Refer to Engine and transaxle assembly in this group) |
| 31. |
Install the RH front wheel.
(Refer to Suspension System - “Wheel”) |
| 32. |
Connect the battery negative terminal.
(Refer to Engine and transaxle assembly in this group) |
| 33. |
Add all the necessary fluids and check for leaks.
Connect GDS. Check for codes, note, and clear. Recheck. |
|
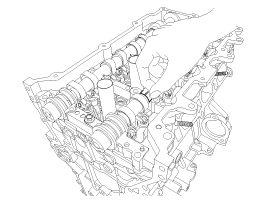
 Cylinder Head Components and Components Location
Components
1. Fuel pump adaptor2. Camshaft bearing cap3. Camshaft front bearing cap4. Exhaust camshaft5. Intake camshaft6. Exhaust CVVT assembly7. Intake CVVT assembly8. Cam carrier9. Cylinder he ...
 Cylinder Block
...
Other information:
Hyundai Tucson (LM) 2010-2015 Owners Manual: Trailer towing
If you are considering to tow with your vehicle, you should first check with
your state's Department of Motor Vehicles to determine legal requirements. Since
laws vary from state to state the requirements for towing trailers, vehicles, or
other types of vehicles or apparatus may differ. Ask an ...
Hyundai Tucson (LM) 2010-2015 Service Manual: Rear Washer Switch Repair procedures
Inspection
Check for continuity between the terminals while operating
the wiper and washer switch. If it is not normal condition, replace
wiper and wiper switch.
[LHD]
[RHD]
Rear Wiper Switch
Rear Washer Switch
...
© 2010-2026 www.htmanual.net
