
Hyundai Tucson: Air Conditioning System / Receiver-Drier Repair procedures
Hyundai Tucson (LM) 2010-2015 Service Manual / Heating, Ventilation and Air Conditioning / Air Conditioning System / Receiver-Drier Repair procedures
| Replacement |
| 1. |
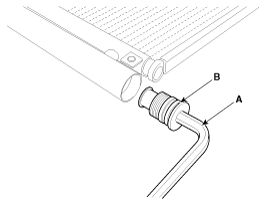
Remove the condenser, and then remove the bottom cap (B) with L wrench (A) from the condenser.
|
| 2. |
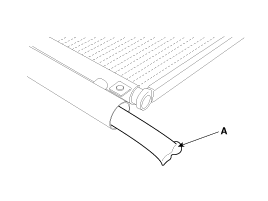
Remove the desiccant (A) from condenser using a long nose plier. Check for crumbled desiccant and clogged bottom cap filter.
|
| 3. |
Apply air conditioning compressor oil along the O-rings and threads of the new bottom cap. |
| 4. |
Insert the new desiccant into the receiver drier tank. The
desiccant must be sealed in vacuum before it is exposed to air for use. |
| 5. |
Install the new bottom cap to the condenser.
|

 Condenser Repair procedures
Inspection
1.
Check the condenser fins for clogging and damage. If clogged,
clean them with water, and blow them with compressed air. If bent,
gently bend them using a screwdriver or pliers.
...
 A/C Pressure Transducer Components and Components Location
Component Location
...
Other information:
Hyundai Tucson (LM) 2010-2015 Owners Manual: Trip Modes
Push the button to select the following modes:
Tripmeter
This mode indicates the distance of individual trips selected since the last
tripmeter reset.
The meter's working range is from 0.0 to 999.9 miles (0.0 to 9999.9 km).
Pressing the TRIP button for more than 1 second, whe ...
Hyundai Tucson (LM) 2010-2015 Service Manual: Rear Disc Brake Repair procedures
Removal
1.
Remove the rear wheel & tire.
Tightening torque :
88.3 ~ 107.9 N.m(9.0 ~ 11.0 kgf.m, 65.1 ~ 79.6 lb-ft)
2.
Remove the upper arm by loosen the rear upper arm bolt (A) and nut (B). [2WD Only]
Tightening torque :
137.2 ~ 156.9N.m (14.0 ~ 16.0kgf.m, 101.2 ~115.7 lb-ft)
...
В© 2010-2026 www.htmanual.net
