Hyundai Tucson: iPod® Mode / Using iPod® Mode
Playing/Pausing iPod® Songs
Once an iPod® is connected, the mode will automatically start and begin playing an iPod® song.
While playing, press the  button
to pause and press
button
to pause and press  button to play.
Ō£Į NOTICE
iPod®s with unsupported communication protocols may not properly operate in the audio system.
Changing Songs
Press the  key to move to the
previous or next song.
key to move to the
previous or next song.
Ō£Į NOTICE
- Pressing the
 key after
the song has been playing for 2 seconds will start the current song from the
beginning.
key after
the song has been playing for 2 seconds will start the current song from the
beginning. - Pressing the
 key before
the song has been playing for 1 seconds will start the previous song.
key before
the song has been playing for 1 seconds will start the previous song. - Slight time differences may exist depending your iPod® product.
Rewinding / Fast-forwarding Songs
While playing, press and hold the
 key (over 0.8 seconds) to rewind or
fast-forward the current song.
key (over 0.8 seconds) to rewind or
fast-forward the current song.
Searching Categories
Turn the  TUNE knob left/right to
search for the desired category.
TUNE knob left/right to
search for the desired category.
Once you find the desired category, press the
 TUNE knob to select and play.
Ō£Į NOTICE
There are eight categories that can be searched, including Playlists, Artists, Albums, Genres, Songs, Composers, Audiobooks and Podcasts.
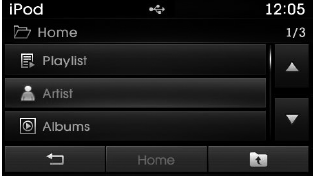
Category Menu
Within the iPod® Category menu, you will have access to the
 , Home, and
 features.
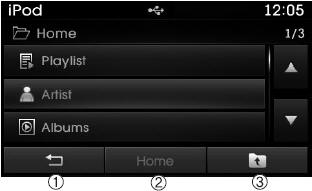
1.  : Displays the play screen
2. Home : Moves to the iPod® root category screen
3.  : Moves to the previous category
Ō£Į NOTICE
- If the search mode is accessed while playing a song, the most recently searched category is displayed.
- Search steps upon initial connection may differ depending on the type of iPod® device.
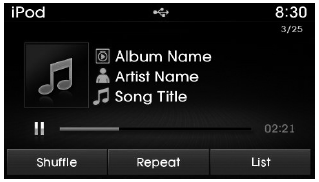
 Basic Mode Screen
1. Mode Displays currently operating mode.
2. Operation State From Repeat/Random(Shuffle), displays the currently operating
function.
3. Song Index Displays the current song/total number of song ...
 iPod® Mode Menu
Within this mode, you will have access to the Random(Shuffle), Repeat and List
features.
Random(Shuffle)
Press the button to play
songs in random(Shuffle) order.
Each time the button i ...
Other information:
Hyundai Tucson (LM) 2010-2015 Service Manual: Control Cable Repair procedures
Inspection
1.
Check the select cable for proper operation and for damage.
2.
Check the shift cable for proper operation and for damage.
3.
Check the boots for damage.
4.
Check the boots for wear abrasion sticking, restricted movement or damage.
5.
Check for the weak or damaged ...
Hyundai Tucson (LM) 2010-2015 Service Manual: Fuel Pressure Control Valve Repair procedures
Inspection
1.
Turn the ignition switch OFF and disconnect the battery negative (-) cable.
2.
Disconnect the fuel pressure regulator valve connector.
3.
Measure resistance between the fuel pressure regulator valve terminals 1 and 2.
4.
Check that the resistance is within the specifica ...
