Hyundai Tucson: Brake System / Brake Line Repair procedures
| Removal |
| 1. |
Disconnect the brake fiuid level switch connector, and remove the reservoir cap. |
| 2. |
Remove the brake fluid from the master cylinder reservior with a syringe.
|

| 3. |
Remove the wheel & tire. |
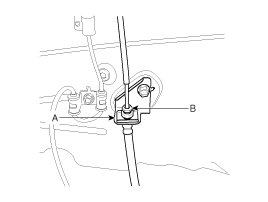
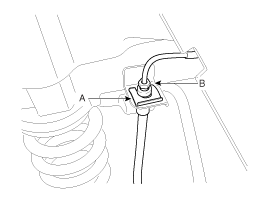
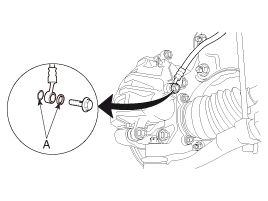
| 4. |
Remove the brake hose clip (A).
[Front]
[Rear]
|
| 5. |
Disconnect the brake tube by loosening the tube flare nut (B).
|
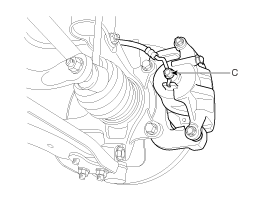
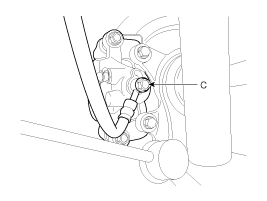
| 6. |
Disconnect the brake hose from the brake caliper by loosening the bolt (C).
[Front]
[Rear]
|
| Inspection |
| 1. |
Check the brake tubes for cracks, crimps and corrosion. |
| 2. |
Check the brake hoses for cracks, damage and fluid leakage. |
| 3. |
Check the brake tube flare nuts for damage and fluid leakage. |
| 4. |
Check brake hose mounting bracket for crack or deformation. |
| Installation |
| 1. |
Installation is the reverse of removal.
|
| 2. |
After installation, bleed the brake system.
(Refer to Brake system bleeding) |
| 3. |
Check the spilled brake oil. |
 Brake Line Components and Components Location
Components
...
 Brake Pedal Components and Components Location
Components
1. Cowl bracket2. Brake pedal member assembly3. Stop lamp switch4. Return spring5. Brake pedal stopper6. Clevis pin7. Snap pin8. Brake pedal
...
Other information:
Hyundai Tucson (LM) 2010-2015 Service Manual: Driver Airbag (DAB) Module and Clock Spring Description and Operation
Description
Driver Airbag (DAB) is installed in the steering wheel and
electrically connected to SRSCM via the clock spring. It protects the
driver by deploying the airbag when frontal crash occurs. The SRSCM
determines deployment of the Driver Airbag (DAB).
Never att ...
Hyundai Tucson (LM) 2010-2015 Service Manual: Specifications
Specification
ItemResistance (x)Driver Airbag (DAB)1.5 ~ 6.0Passenger Airbag (PAB)1.5 ~ 6.0Side Airbag (SAB)1.5 ~ 6.0Curtain Airbag (CAB)1.5 ~ 6.0Seat Belt Pretensioner (BPT)1.5 ~ 6.0Anchor Pretensioner (APT)1.5 ~ 6.0
Tightening Torques
ItemN.mkgf.mlb-ftDriver Airbag (DAB)7.8 ~ 10.80.8 ~ ...
