Hyundai Tucson: Cylinder Head Assembly / Camshaft Repair procedures
Timing chain cover removal is not required for this procedure.
| • |
Use fender covers to avoid damaging painted surfaces. |
| • |
To avoid damage, unplug the wiring connectors carefully while holding the connector portion. |
|
| • |
Mark all wiring and hoses to avoid misconnection. |
| • |
Turn the crankshaft pulley so that the No. 1 piston is at top dead center. |
|
| 1. |
Remove the cylinder head cover. (Refer to Timing system in this group) |
| 2. |
Remove the fuel pump adaptor assembly (A). 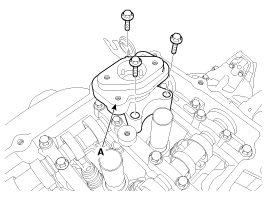
|
| 3. |
Set No.1 cylinder to TDC (Top dead center) on compression stroke.
| (1) |
Turn the crankshaft pulley and align its groove with the timing mark of the timing chain cover. 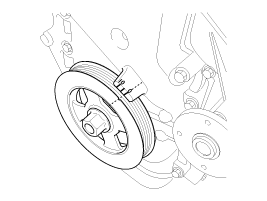
|
| (2) |
Check that the TDC marks of the intake and exhaust CVVT
sprockets are in straight line on the cylinder head surface as shown in
the illustration. If not, turn the crankshaft by one revolution (360°)
more. 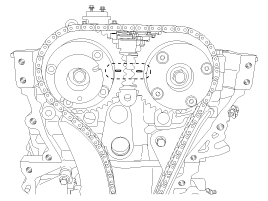
|
| (3) |
Mark the timing chains corresponding to the timing marks of the CVVT sprockets. 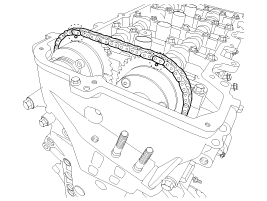
|
|
| 4. |
Remove the crankshaft damper pulley. 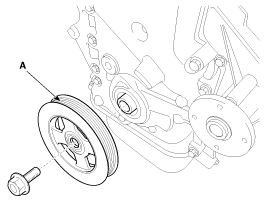
|
Do not press the pulley or apply the excessive force to prevent the rubber part from being deformed. |
|
There are two methods to hold the ring gear when removing the crankshaft damper pullly.
| • |
Install the SST (09231-2B100) to hold the ring gear after removing the starter. 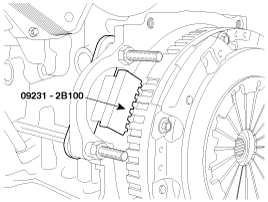
|
| • |
Install the SST (09231-3D100) to hold the ring gear after removing the service cover. |
| 1. |
Remove the air guard (A). 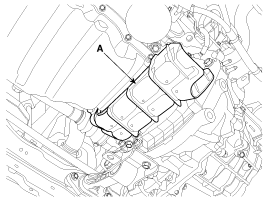
|
| 2. |
Remove the two transaxle mounting bolts (A) and the service cover (B) on the bottom of the lower crankcase. 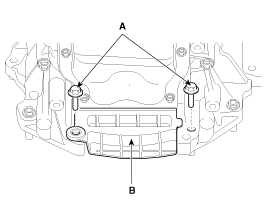
|
| 3. |
Adjust the length of the holder (A) so that the grooves of the holder puts into the ring gears (B) at the closest position. |
| 4. |
Adjust the angle and length of the links (C) so that the two
transaxle mounting bolts can be fastened into the original mounted
holes. 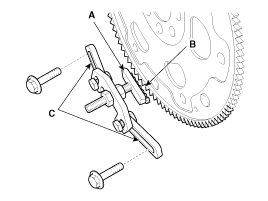
|
| 5. |
Install the SST using the two transaxle mounting bolts. Tighten the bolts and nuts of the holder and links securely. 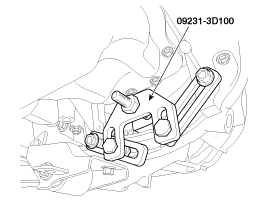
|
|
|
| 5. |
Remove the service plug bolt (A) with the gasket (B). 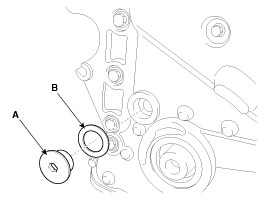
|
| 6. |
Remove the tensioner arm bolt (A). 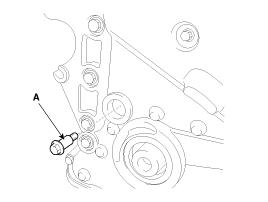
|
| 7. |
Push down the tensioner arm (A). 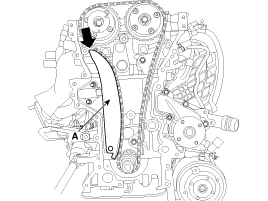
|
| 8. |
Remove the camshaft bearing caps. 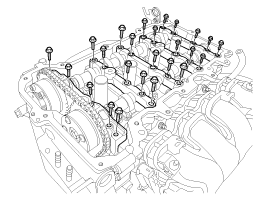
|
| 9. |
Remove the exhaust camshaft (A) first, then intake camshaft (B). 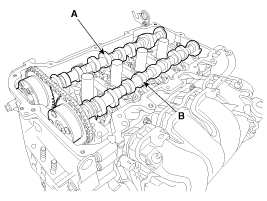
|
| 10. |
Remove the tensioner arm (A). 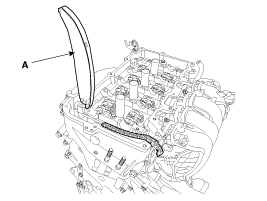
|
To hold the timing chain, tie it with strap. |
|
| 1. |
Compress the piston of the tensioner using a handy bar (A)
and then insert a stopper pin (B) into the hole on the tensioner to hold
the compressed piston. 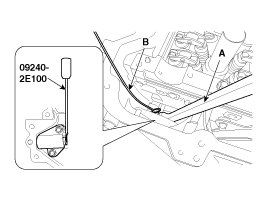
|
| 2. |
Place the intake camshaft (A) and then insert the tensioner arm (B) along the timing chain. 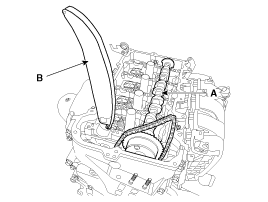
|
| 3. |
Place the exhaust camshaft (A). 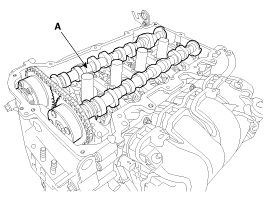
|
The timing marks of each CVVT sprocket should be matched with
timing marks (painted link) of timing chain when installing the timing
chain. |

|
| 4. |
Install the camshaft bearing caps. 
Tighten the bolts, in several passes, in the sequence as shown.
Tightening torque
M6 bolts:
11.8 ~ 13.7 N.m (1.2 ~ 1.4 kgf.m, 8.7 ~ 10.1 lb-ft)
M8 bolts:
18.6 ~ 22.6 N.m (1.9 ~ 2.3 kgf.m, 13.7 ~ 16.6 lb-ft)
|
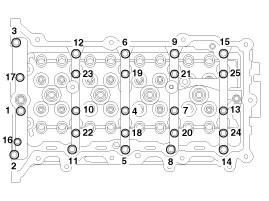
|
Be careful not to change the position and direction of bearing caps. |
|
| 5. |
Using a suitable tool, move the tensioner arm to align the tensioner bolt hole with the service hole. 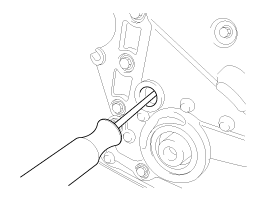
|
| 6. |
Install the tensioner arm bolt (A).
Tightening torque:
18.6 ~ 22.6 N.m (1.9 ~ 2.3 kgf.m, 13.7 ~ 16.6 lb-ft)
|

|
| 7. |
Remove the stopper pin from the tensioner. |
| 8. |
Turn the crankshaft two turns in the operating direction
(clockwise), and then check that the TDC marks of the CVVT sprockets are
in straight line on the cylinder head surface. 
|
| 9. |
Install a service plug bolt (A) with a gasket (B).
Tightening torque:
29.4 ~ 39.2 N.m (3.0 ~ 4.0 kgf.m, 21.7 ~ 28.9 lb-ft)
|

|
Do not reuse the service plug bolt and gasket. |
|
| 10. |
Install the crankshaft damper pulley (A).
Tightening torque:
196.1 ~ 205.9 N.m (20.0 ~ 21.0 kgf.m, 144.7 ~ 151.9 lb-ft)
|

|
Do not press the pulley or apply the excessive force to prevent the rubber part from being deformed. |
|
There are two methods to hold the ring gear when installing the crankshaft damper pullly.
| • |
Install the SST (09231-2B100) to hold the ring gear after removing the starter. 
|
| • |
Install the SST (09231-3D100) to hold the ring gear after removing the service cover. |
| 1. |
Remove the air guard (A). 
|
| 2. |
Remove the two transaxle mounting bolts (A) and the service cover (B) on the bottom of the lower crankcase. 
|
| 3. |
Adjust the length of the holder (A) so that the grooves of the holder puts into the ring gears (B) at the closest position. |
| 4. |
Adjust the angle and length of the links (C) so that the two
transaxle mounting bolts can be fastened into the original mounted
holes. 
|
| 5. |
Install the SST using the two transaxle mounting bolts. Tighten the bolts and nuts of the holder and links securely. 
|
|
|
| 11. |
Install the fuel pump adaptor assembly (A).
Tightening torque:
12.6 ~ 26.5 N.m (2.2 ~ 2.7 kgf.m, 15.9 ~ 19.5 lb-ft)
|

|
| 12. |
Install the cylinder head cover. (Refer to Timing system in this group) |
Components
1. Fuel pump adaptor2. Camshaft bearing cap3. Camshaft front bearing cap4. Exhaust camshaft5. Intake camshaft6. Exhaust CVVT assembly7. Intake CVVT assembly8. Cam carrier9. Cylinder he ...
Other information:
Hyundai Tucson (LM) 2010-2015 Owners Manual: Front windshield defroster (if equipped)
To activate the front windshield defroster, press the front windshield defroster
button located in the center facia switch panel.
The indicator on the front windshield defroster button illuminates when the deicer
is ON.
The front windshield defroster automatically turns off after approxima ...
Hyundai Tucson (LM) 2010-2015 Owners Manual: Call History
Press the key
Select [Call History]
A list of incoming, outgoing and missed calls is displayed.
Call history may not be saved in the call history list in some mobile phones.
Calls received with hidden caller ID will not be saved in the call history
list.
Calling through the call his ...
 Cylinder Head Components and Components Location


