
Hyundai Tucson: Air Conditioning System / Compressor Repair procedures
Hyundai Tucson (LM) 2010-2015 Service Manual / Heating, Ventilation and Air Conditioning / Air Conditioning System / Compressor Repair procedures
| Removal |
| 1. |
If the compressor is marginally operable, run the engine at
idle speed, and let the air conditioning work for a few minutes, then
shut the engine off. |
| 2. |
Disconnect the negative cable from the battery. |
| 3. |
Recover the refrigerant with a recovery/charging station. |
| 4. |
Loosen the drive belt.(Refer to EM group-Drive belt) |
| 5. |
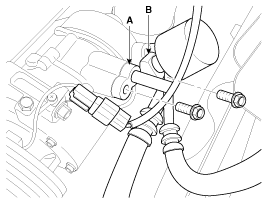
Remove the bolts, then disconnect the suction line (A) and
discharge line (B) from the compressor. Plug or cap the lines
immediately after disconnecting them to avoid moisture and dust
contamination.
|
| 6. |
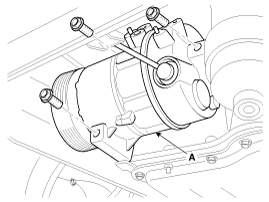
Disconnect the compressor clutch connector and then remove 3 mounting bolts and the compressor (A).
|
| Installation |
| 1. |
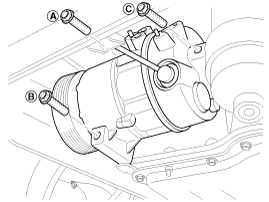
Make sure of the length of compressor mounting bolts, and then tighten it A>B>C order.
|
| 2. |
Install in the reverse order of removal, and note these items.
|
| Inspection |
| 1. |
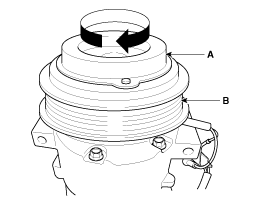
Check the plated parts of the disc & hub assembly (A) for
color changes, peeling or other damage. If there is damage, replace the
clutch set. |
| 2. |
Check the pulley (B) bearing play and drag by rotating the
pulley by hand. Replace the clutch set with a new one if it is noisy or
has excessive play/drag.
|
| 3. |
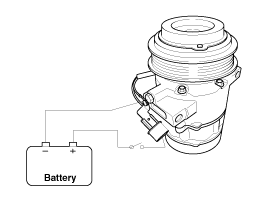
Check operation of the magnetic clutch. Connect the
compressor side terminals to the battery (+) terminal and the ground
battery (-) terminal to the compressor body. Check the magnetic clutch
operating noise to determine the condition.
|
| Disassembly |
| 1. |
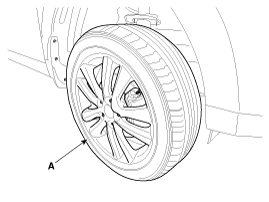
Remove the front left tire (A).
|
| 2. |
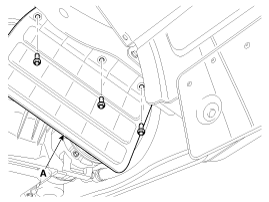
Remove the engine side cover (A).
|
| 3. |
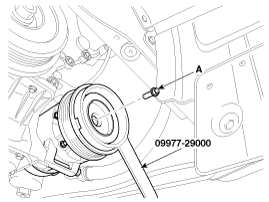
Remove the center bolt (A) while holding the disc & hub assembly with SST( 09977-29000).
|
| 4. |
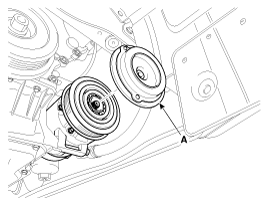
Remove the disc & hub assembly (A) and shim (gap washer) , taking care not to lose the shims.
|
| 5. |
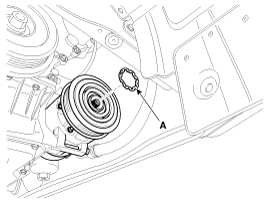
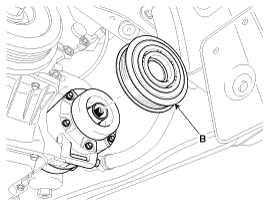
Disconnect the retainer ring (A) and then remove the pulley(B).
|

| 6. |
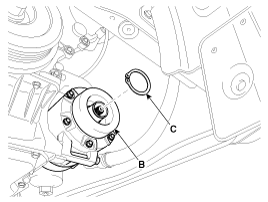
Remove the retainer ring (B) and then remove the field coil (C). Be careful not to damage the coil and compressor.
|
| 7. |
Reassemble the compressor clutch in the reverse order of disassembly, and note these items :
|
 Compressor Components and Components Location
Components
1. Bolt2. Disc & Hub Assembly 3. Retainer Ring (Pully) 4. Pully5. Retainer Ring (Field coil)6. Field Coil7. Compressor Assembly
...
 Condenser Components and Components Location
Component Location
...
Other information:
Hyundai Tucson (LM) 2010-2015 Service Manual: Interior Body Repair
Interior A
Interior B
Interior C
Interior D
...
Hyundai Tucson (LM) 2010-2015 Service Manual: Specifications
Specifications
Manual transaxle typeM6CF4Engine type Gasoline 2.0 GDIGear ratio1st3.7692nd2.0803rd1.3874th1.0795th0.8846th0.744Reverse3.077Final gear ratio1st ~ 6th4.533Reverse5.231
Tightening Torques
ItemsN.mkgf.mlb-ftOil drain plug 58.9 ~ 78.56.0 ~ 8.043.4 ~ 57.8Oil filler plu ...
В© 2010-2026 www.htmanual.net
