Hyundai Tucson: Controller / Heater & A/C Control Unit(Manual) Repair procedures
Hyundai Tucson (LM) 2010-2015 Service Manual / Heating, Ventilation and Air Conditioning / Controller / Heater & A/C Control Unit(Manual) Repair procedures
| Replacement |
| 1. |
Disconnect the negative (-) battery terminal. |
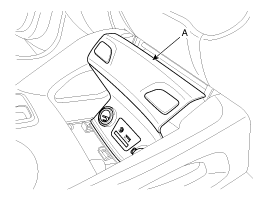
| 2. |
Remove the console upper cover (A).
|
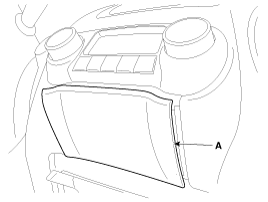
| 3. |
Using the screwdriver, remove the center facia lower cover (A).
|
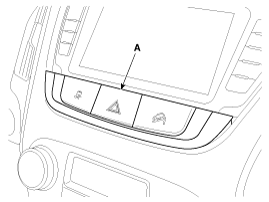
| 4. |
Using the screwdriver, remove the center facia lower switch assembly (A).
|
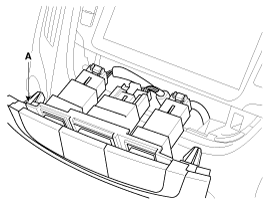
| 5. |
Disconnect the connectors and then remove the center facia lower switch assembly (A).
|
| 6. |
Loosen the control panel mounting screws and then remove the control panel (A).
|
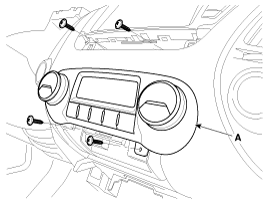
| 7. |
Disconnect the connectors and then remove the control panel (A).
|

| 8. |
Install in the reverse order of removal. |
 Heater & A/C Control Unit(Manual) Components and Components Location
Components
Connector Pin Function
ConnectorPin NoFunctionConnectorPin NOFunctionConnector(A)1Middle HighConnector(B)1Tail Lamp (ILL+)2-2Battery 3GND3Mode Actuator (VENT)4High4Mode Actuator (DEF)5M ...
 Heater & A/C Control Unit(Dual) Components and Components Location
Components
Control Panel
Connector Pin Function
ConnectorPin NOFunctionConnectorPin NOFunctionConnector(A)1BatteryConnector(B)1CAN (LOW)2Tail Lamp (ILL+)2CAN (HIGH)3IG23Intake Actuator (F/B)4DR ...
Other information:
Hyundai Tucson (LM) 2010-2015 Owners Manual: Do not lie down
Sitting in a reclined position when the vehicle is in motion can be dangerous.
Even when buckled up, the protections of your restraint system (seat belts and
air bags) is greatly reduced by reclining your seatback.
To reduce the chance of injuries in the event of an accident and to achieve the
...
Hyundai Tucson (LM) 2010-2015 Service Manual: Special Service Tools
Special Tools
Tool (Number and name)IllustrationUse09880-4F000Hog ring clip installerHog ring clip Installation09816-2S100Fixed glass fixture Installation the fixed glass
...
© 2010-2026 www.htmanual.net
