Hyundai Tucson: Hydraulic System / Oil Cooler Repair procedures
Hyundai Tucson (LM) 2010-2015 Service Manual / Automatic Transaxle System / Hydraulic System / Oil Cooler Repair procedures
| Inspection |
Radiator Cap Testing
| 1. |
Remove the radiator cap, wet its seal with engine coolant, and then install it on a pressure tester.
|
| 2. |
Apply a pressure of 93.16 ~ 122.58 kPa (0.95 ~ 1.25 kgf/cmx, 13.51 ~ 17.78 psi). |
| 3. |
Check for a drop in pressure. |
| 4. |
If the pressure drops, replace the cap. |
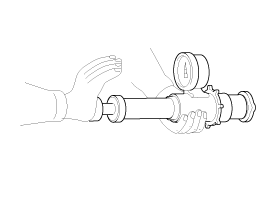
Radiator Leakage Test
| 1. |
Wait until engine is cool, then carefully remove the radiator
cap and fill the radiator with engine coolant, then install it on the
pressure tester (A).
|
| 2. |
Apply a pressure tester to the radiator and apply a pressure of 93.16 ~ 122.58 kPa (0.95 ~ 1.25 kgf/cmx, 13.51 ~ 17.78 psi). |
| 3. |
Inspect for engine coolant leaks and a drop in pressure. |
| 4. |
Remove the tester and reinstall the radiator cap.
|

| Removal and Installation |
| 1. |
Disconnect the battery negative terminal. |
| 2. |
Remove the air cleaner assembly. (Refer to Intake and exhaust system in this group) |
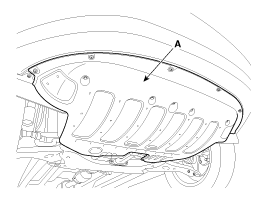
| 3. |
Remove the under cover (A).
|
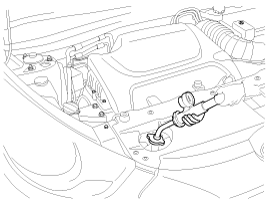
| 4. |
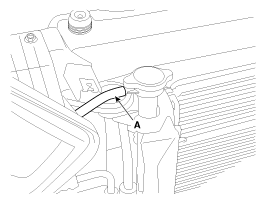
Loosen the drain plug (A), and drain the coolant.
Remove the radiator cap to speed draining.
|

| 5. |
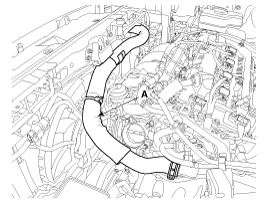
Remove the radiator upper hose (A).
|
| 6. |
Remove the radiator lower hose (A).
|
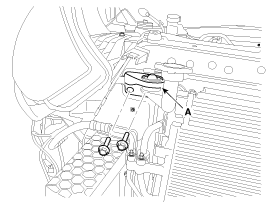
| 7. |
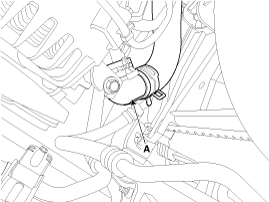
Disconnect the fan motor connector (A) and then remove the cooling fan assembly.
|
| 8. |
Remove the front bumper. (Refer to BD group) |
| 9. |
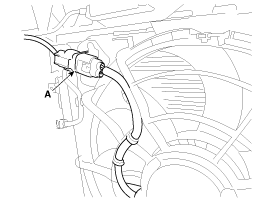
Disconnect the over flow hose (A) from the radiator.
|
| 10. |
Remove the cover (A) and the air guard (B) and then separate the condenser from the radiator.
|
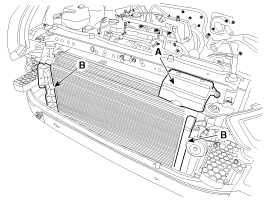
| 11. |
Remove the radiator mounting bracket (A) and then pull the radiator upper from vehicle.
|

| 12. |
Installation is in the reverse order of removal. |
| 13. |
Fill the radiator with coolant and check for leaks.
|
 Oil Cooler Components and Components Location
Components
1. Cooling fan assembly2. Radiator3. Mounting insulator4. Radiator upper mounting bracket5. Radiator upper hose6. Radiator lower hose7. Reservoir tank8. Over flow hose9. ATF cool ...
 Oil Pump Description and Operation
Description
The oil pump is built-in as a single unit with the 2/6 brake
chamber. Rotation of the pump builds the hydraulic pressure needed for
the lubrication of the various parts of the trans ...
Other information:
Hyundai Tucson (LM) 2010-2015 Service Manual: Inhibitor Switch Repair procedures
Inspection
•
Thoroughly check connectors for looseness, poor connection, bending, corrosion, contamination, deterioration, or damage.
Inspection flow
Items to check
1.
Inspect DTC code.
2.
Inspect whether N setting matches.
A.
Adjust N setting (refer to ...
Hyundai Tucson (LM) 2010-2015 Owners Manual: Side impact air bags
Your vehicle is equipped with a side impact air bag in each seat. The purpose
of the air bag is to provide the vehicle's driver and the front passenger with additional
protection than that offered by the seat belt alone.
The side impact air bags are designed to deploy only during certain side ...
© 2010-2026 www.htmanual.net
