Hyundai Tucson: Rear Axle Assembly / Rear Hub - Carrier Repair procedures
Hyundai Tucson (LM) 2010-2015 Service Manual / Driveshaft and axle / Rear Axle Assembly / Rear Hub - Carrier Repair procedures
| Removal |
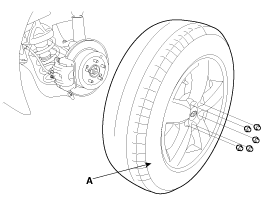
| 1. |
Remove the rear wheel and tire (A) from rear hub.
|

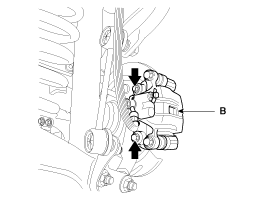
| 2. |
Remove the rear brake caliper mounting bolts, and then fix the brake caliper assembly with wire.
[4WD]
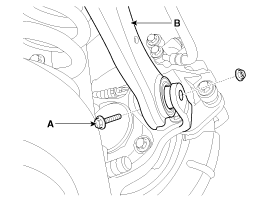
[2WD]
Loosen the upper arm mounting bolts(A) and then remove the caliper(B) by loosen the brake caliper mounting bolts.
|
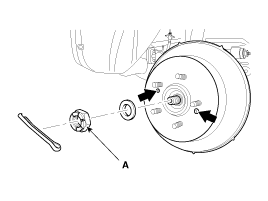
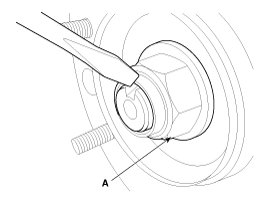
| 3. |
Remove the coking nut (A) and loosen the screw to remove the disc.
|
| 4. |
Loosen the nuts & bolts and then remove the trailing arm (A) with the rear axle.
[2WD]
[4WD]
|


| 5. |
Remove the parking brake cable.
(Refer to Brake System - "Parking Brake Cable") |
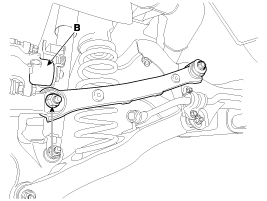
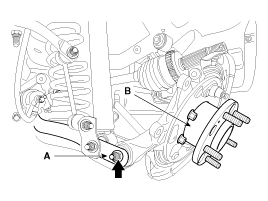
| 6. |
Remove the rear assist arm (B) after loosen the bolt (A).
[2WD]
[4WD]
|
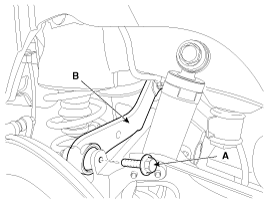
| 7. |
Remove the rear upper arm (A) after loosen the bolt (B). [4WD]
|
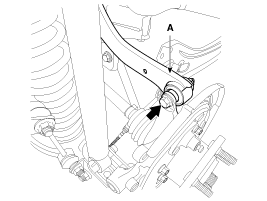
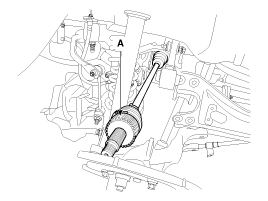
| 8. |
Push the rear axle carrier outward and separate the driveshaft (A) from the axle hub.
|
| 9. |
Loosen the lower arm mounting bolt(A) and then remove the rear axle assembly(B).
|
| 10. |
Install in the reverse order of removal. |
| Disassembly |
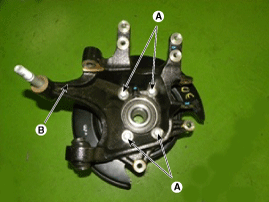
| 1. |
Remove the hub assembly mounting bolts (A-4ea) from the rear axle carrier (B).
|
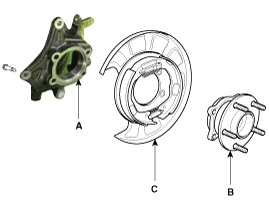
| 2. |
Remove the hub assembly (C) and the parking brake assembly (B) from the rear axle carrier (A).
|
| 3. |
Assembly is the reverse order of disassembly. |
| Inspection |
| 1. |
Check the hub for cracks and the splines for wear. |
| 2. |
Check the rear axle carrier for cracks. |
 Rear Hub - Carrier Components and Components Location
Components
1. Rear carrier assembly2. Parking brake assembly3. Rear hub assembly4. Rear brake disc
...

Other information:
Hyundai Tucson (LM) 2010-2015 Service Manual: Special Service Tools
Special Service Tools
Tool (Number and name)IllustrationUse09977-29000Disc & hub assembly bolt removerRemoval and installation of disc & hub assembly.
...
Hyundai Tucson (LM) 2010-2015 Service Manual: Special Service Tools
Special Service Tools
Tool (Number and name)IllustrationUseCrankshaft front oil seal installer(09231-2E000)Installation of the front oil seal 09231-2E000 (installer)Valve stem seal installer(09222-2E000)Installation of the valve stem oil sealValve spring compressor(09222-3K000)(09222-3K100)Remo ...
© 2010-2026 www.htmanual.net
