Hyundai Tucson: Exterior / Tail Gate Repair procedures
Tail Gate Trim Replacement
| • |
When prying with a flat-tipped screwdriver, wrap it with
protective tape, and apply protective tape around the related parts, to
prevent damage. |
| • |
Put on gloves to protect your hands. |
| • |
Make sure the tailgate locks/unlocks and opens/closes properly. |
|
| 1. |
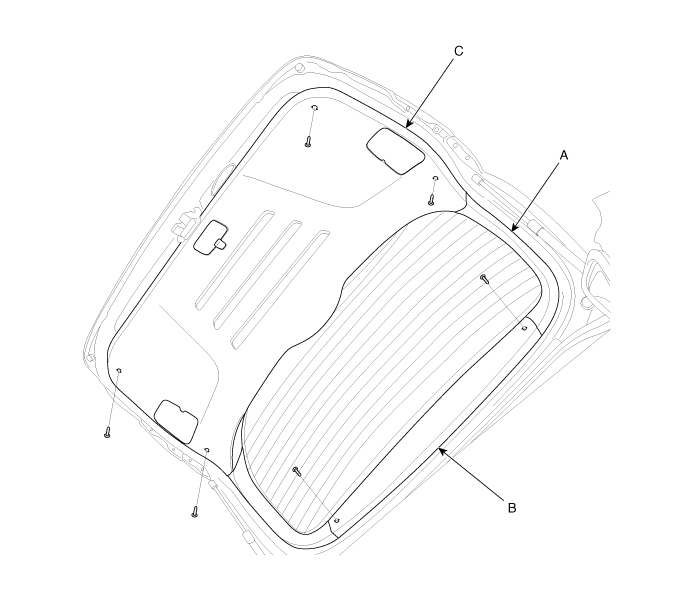
Remove the upper trim (B). |
| 2. |
After loosening the mounting screws, then remove the tailgate trim (C) and side trim (A). |
| 3. |
Install in the reverse order of removal.
| • |
Replace and damaged clips. |
| • |
Make sure the opens securely |
|
|
Tail Gate Latch Replacement
| 1. |
Remove the tail gate trim. |
| 2. |
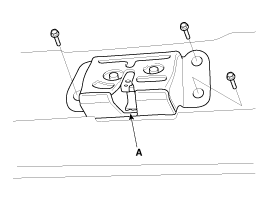
After loosening the mounting bolts, then remove the latch assembly (A).
Tightening torque :
6.9 ~ 10.8 N.m (0.7 ~ 1.1 kgf.m, 5.1 ~ 8.0 lb-ft )
|
|
| 3. |
Install in the reverse order of removal.
| • |
Make sure the tail gate opens properly. |
|
|
Tail Gate Lift Replacement
| • |
Take care not to be closed the tail gate, when removing the life. |
|
| 1. |
Using a screwdriver (A), lift the socket clip (B) up slightly
on both ends of the lifter (D), and then remove the lifter from the
bracket (C). 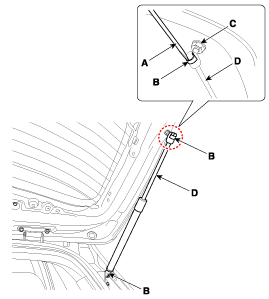
|
| 2. |
Push the socket of the lifter into the bracket for installation.
| • |
Make sure the tailgate locks/unlocks and opens/closes properly. |
|
|
Tail Gate weatherstrip Replacement
| • |
Do not apply sealant to the body. |
|
| 1. |
Remove the tail gate weatherstrip (A). 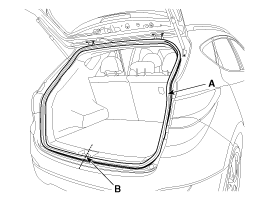
|
| 2. |
Install in the reverse order of removal.
| • |
Install the weatherstrip aligned with canter line (B). |
|
|
| 1. |
Check that the door and body edges are parallel. |
| 2. |
After loosening the tailgate hinge (A) mounting bolt, adjust the tailgate by moving it up or down, or right or left. |
| 3. |
Adjust the striker (D) by moving it up or down, or right or left. |
| 4. |
Make sure the trunk lid opers and locks securely. 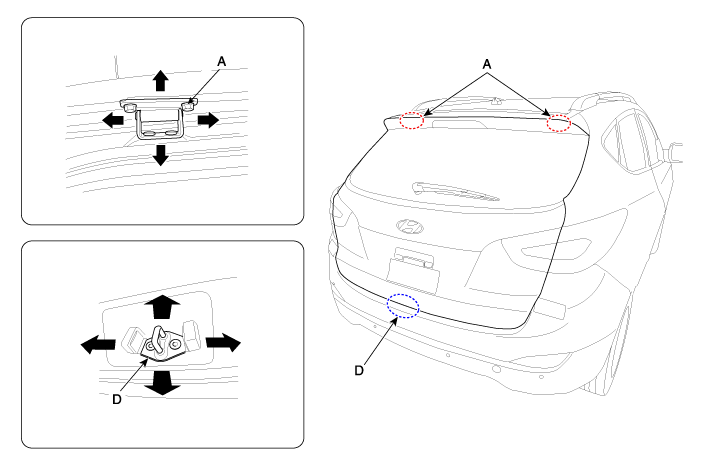
|
Replacement
Hood Assembly Replacement
•
When removing and installing the hood, an assistant is necessary.
•
Take care not to damaged the hood and body.
• ...
Components
1.Door inside handle housing2. Door trim3. Door belt inner weatherstrip 4. Door screen 5. Door module 6. Quadrant inner cover 7. Door panel 8. Door belt outside weatherstrip9. Door si ...



 Hood Repair procedures
 Front Door Components and Components Location