Hyundai Tucson: Charging System / Alternator Schematic Diagrams
Hyundai Tucson (LM) 2010-2015 Service Manual / Engine Electrical System / Charging System / Alternator Schematic Diagrams
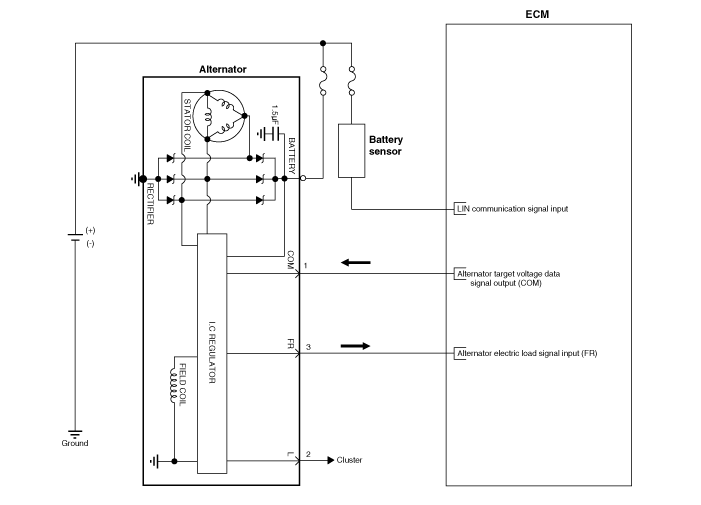
| Circuit Diagram |
|

 Alternator Components and Components Location
Components
1. OAD (Overrunning Alternator Decoupler) pulley2. Front housing3. Front bearing4. Stator5. Rotor 6. Rear bearing 7. Rear housing 8. Rectifier assembly 9. Regulator assembly 10. Rear c ...
 Alternator Repair procedures
Removal
1.
Turn ignition switch OFF and disconnect the negative (-) battery cable.
2.
Remove the drive belt.
(Refer to Engine Mechanical System - "Drive Belt")
3.
Disconnect the alternat ...
Other information:
Hyundai Tucson (LM) 2010-2015 Owners Manual: Air bag collision sensors
WARNING
To reduce the risk of an air bag deploying unexpectedly and causing serious
injury or death:
Do not hit or allow any objects to impact the locations where air bags
or sensors are installed.
Do not perform maintenance on or around the air bag sensors. If the location
or angle o ...
Hyundai Tucson (LM) 2010-2015 Service Manual: Inhibitor Switch Repair procedures
Inspection
•
Thoroughly check connectors for looseness, poor connection, bending, corrosion, contamination, deterioration, or damage.
Inspection flow
Items to check
1.
Inspect DTC code.
2.
Inspect whether N setting matches.
A.
Adjust N setting (refer to ...
© 2010-2026 www.htmanual.net
