Hyundai Tucson: Seat Belt Pretensioner / Anchor Pretensioner Repair procedures
Hyundai Tucson (LM) 2010-2015 Service Manual / Restraint / Seat Belt Pretensioner / Anchor Pretensioner Repair procedures
| Removal |
| 1. |
Disconnect the battery negative cable, and wait for at least three minutes before beginning work. |
| 2. |
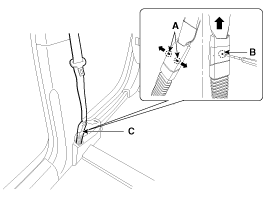
To remove the seat belt anchor pretensioner (C), keep on
pushing the lock pins (A) as arrow direction. And then remove the seat
belt after pushing the lock pin (B).
|
| 3. |
Remove the following parts. (Refer to the Body group-Interior trim)
|
| 4. |
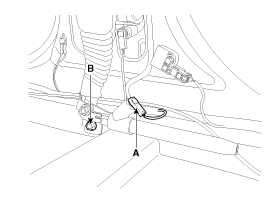
Disconnect the anchor pretensioner connector (A).
|
| 5. |
Loosen the anchor pretensioner mounting bolt (B) and remove the anchor pretensioner. |
| Installation |
| 1. |
Remove ignition key from the vehicle. |
| 2. |
Disconnect the negative (-) cable from battery and wait for at least three minutes. |
| 3. |
Install the anchor pretensioner with a bolt.
|
| 4. |
Connect the anchor pretensioner connector. |
| 5. |
Install the following parts. (Refer to the body group - Interior trim)
|
| 6. |
Insert the seat belt to the anchor pretensioner.
|

| 7. |
Reconnect the battery negative cable. |
| 8. |
After installing the anchor pretensioner, confirm proper system operation:
|
 Anchor Pretensioner Components and Components Location
Components
...
 Brake System
...
Other information:
Hyundai Tucson (LM) 2010-2015 Service Manual: Components and Components Location
Components
1. Steering wheel2. Steering column3. ECU4. Motor5. Steering gear box
...
Hyundai Tucson (LM) 2010-2015 Owners Manual: Heating and air conditioning
1. Start the engine.
2. Set the mode to the desired position.
To improve the effectiveness of heating and cooling;
- Heating:
- Cooling:
3. Set the temperature control to the desired position.
4. Set the air intake control to the outside (fresh) air position.
5. Set the fan speed control to ...
© 2010-2026 www.htmanual.net
