Hyundai Tucson: Rear Suspension System / Rear Assist Arm Repair procedures
Hyundai Tucson (LM) 2010-2015 Service Manual / Suspension System / Rear Suspension System / Rear Assist Arm Repair procedures
| Replacement |
| 1. |
Remove the rear wheel & tire.
|

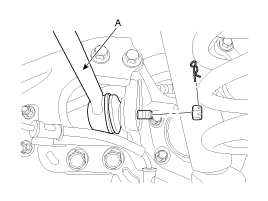
| 2. |
Remove the sprit pin and castle nut or bolt and then disconnect the rear assist arm (A) from the rear axle.
[2WD]
[4WD]
|
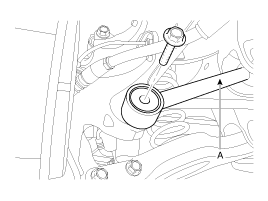
| 3. |
Loosen the bolt & nut and then remove the rear assist arm (A) with the sub frame.
[2WD]
[4WD]
|
| 4. |
Installation is the reverse of removal. |
| Inspection |
| 1. |
Check the bushing for wear and deterioration. |
| 2. |
Check the rear assist arm for deformation. |
| 3. |
Check ball joint for damage. |
| 4. |
Check for the all bolts and nuts. |
 Rear Stabilizer Bar Repair procedures
Replacement
1.
Remove the rear wheel & tire.
Tightening torque :
88.3 ~ 107.9N.m (9.0 ~ 11.0kgf.m, 65.1 ~ 79.6lb-ft)
Be careful not to damage to the hub bolts when ...
 Trailing Arm Repair procedures
Replacement
1.
Remove the rear wheel & tire.
Tightening torque :
88.3 ~ 107.9 N.m (9.0 ~ 11.0 kgf.m, 65.1 ~ 79.6 lb-ft)
Be careful not to damage to the hub bolts w ...
Other information:
Hyundai Tucson (LM) 2010-2015 Service Manual: Components and Components Location
Component Location
1. Audio unit2. Tweeter speaker3. Antenna cable connector4. Roof antenna (Radio)5. Front door speaker6. Rear door speaker7. Sub woofer speaker8. Antenna feeder cable9. External amp
...
Hyundai Tucson (LM) 2010-2015 Service Manual: Yaw-rate and G Sensor Description and Operation
Description
When the vehicle is turning with respect to a vertical axis
the yaw rate sensor detects the yaw rate electroniclly by the vibration
change of plate fork inside the yaw rate sensor.
If yaw velocity reaches the specific velocity after it detects the vehicle'yawing, the ESP control ...
© 2010-2026 www.htmanual.net
