Hyundai Tucson: Rear Suspension System / Rear Shock Absorber Repair procedures
Hyundai Tucson (LM) 2010-2015 Service Manual / Suspension System / Rear Suspension System / Rear Shock Absorber Repair procedures
| Replacement |
| 1. |
Remove the rear wheel & tire.the rear wheel & tire.
|

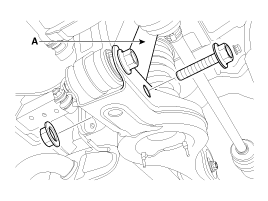
| 2. |
Loosen the bolt & nut and then disconnect the shock absorber (A) with the rear axle.
|
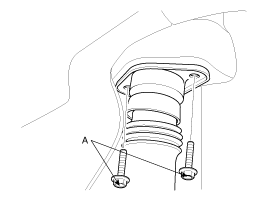
| 3. |
Loosen the shock absorber mounting bolts (A).
|
| 4. |
Installation is the reverse of removal. |
| Inspection |
| 1. |
Check the rubber parts for damage or deterioration. |
| 2. |
Check the shock absorber for abnormal resistance or unusual sounds. |
Disposal
| 1. |
Fully extend the shock absorber rod. |
| 2. |
Drill a hole to remove gas from the cylinder.
|
 Rear Shock Absorber Components and Components Location
Components
1. Self locking nut2. Bracket assembly3. Bumper rubber4. Dust cover5. Shock absorber
...
 Rear Upper Arm Repair procedures
Replacement
1.
Remove the rear wheel & tire.
Tightening torque :
88.3 ~ 107.9N.m (9.0 ~ 11.0kgf.m, 65.1 ~ 79.6lb-ft)
Be careful not to damage to the hub bolts when ...
Other information:
Hyundai Tucson (LM) 2010-2015 Service Manual: Oil Pump Repair procedures
Removal and Installation
1.
Remove the timing chain cover.
(Refer to Timing system in this group)
2.
Remove the oil pump cover (A).
Tightening torque
Screws :
5.9 ~ 8.8 N.m (0.6 ~ 0.9 kgf.m, 4.3 ~ 6.5 lb-ft)
Bolts :
8.8 ~ 13.7 N.m (0.9 ~ 1.4 kgf.m, 6.5 ~ 10.1 lb-ft)
3.
Remove ...
Hyundai Tucson (LM) 2010-2015 Service Manual: Back-up Lamp Switch Specifications
Specifications
ItemSpecifications Working voltage DC 10~15V Operating force3.0kg MaxVoltage drop-0.4VWorking temperature­30°C ~ 100°C [-30°F ~ 212°F]
...
┬® 2010-2026 www.htmanual.net
